
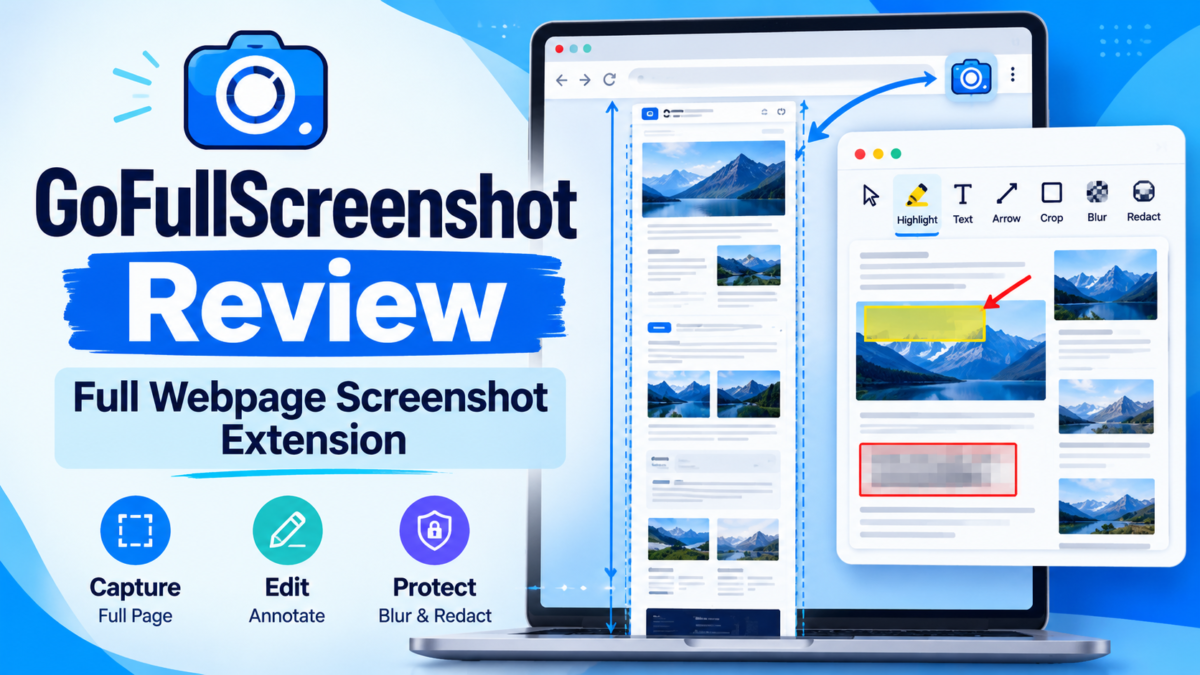
Disclosure: The developer of GoFullScreenshot contacted me about this extension. I tested it myself on my own TechMitra pages, I was not paid for this review, and the opinions here are my own.
I am a website developer, so I take screenshots of websites all the time. I check how a page looks after a theme or plugin change, keep a record of a page before I edit it, and create images for my own articles. A normal screenshot only captures what fits on the screen, and most of my pages are much longer than that. So I rely on a full webpage screenshot extension, one that scrolls down the page, stitches the sections together and gives me a single image.
For a long time I used GoFullPage for this. Then the developer of a newer extension, GoFullScreenshot, got in touch and asked me to try it.
My first attempt did not go well. When I tried to load the extension, Chrome showed an Enhanced Safe Browsing warning, so I left it alone and did not recommend it. The developer later followed up. He said the warning was related to the newness of the extension and the developer account, and asked me to take another look. I installed the latest version, and this time it worked properly. One feature caught my attention straight away: it can download screenshots as WebP files, which suits a website owner very well.
So I tested it properly. This review covers what I tried, what I measured, how it compares with GoFullPage, and what I have not tested yet.
Table of Contents
Also Read : 25 Best Free Chrome Extensions for Productivity in 2026
What Is a Full Webpage Screenshot Extension?
A full webpage screenshot extension is a browser extension that captures an entire webpage as a single image, including content that extends beyond the visible screen. Unlike a regular screenshot, which captures only the visible portion of a page, it can scroll through the webpage and combine the captured sections into one long image.
These extensions are useful for bloggers, website developers, designers, and anyone who wants to save or share an entire webpage. Depending on the extension, features may include editing screenshots, highlighting important information, hiding sensitive details, and exporting images in formats such as PNG, JPEG, or WebP.
GoFullScreenshot is a full webpage screenshot extension that works in Google Chrome and Microsoft Edge. In Edge, you can install it through the Chrome Web Store. It offers full-page capture, annotation tools, and multiple export options, making it useful for documenting website layouts, preparing tutorials, and sharing webpage content.
Quick verdict
GoFullScreenshot is a free full page capture Chrome extension that captures a full web page as a single image, with a built-in editor and WebP export. In my test it handled a very long article cleanly, and its files were smaller than the ones I got from GoFullPage on the same page. It is new and has far fewer users than the older tools, so its track record is short. If you want WebP screenshots, or you want to blur or redact details before sharing, it is worth installing. If you only want the quickest possible full-page image, a simpler tool may suit you better.
What is GoFullScreenshot?
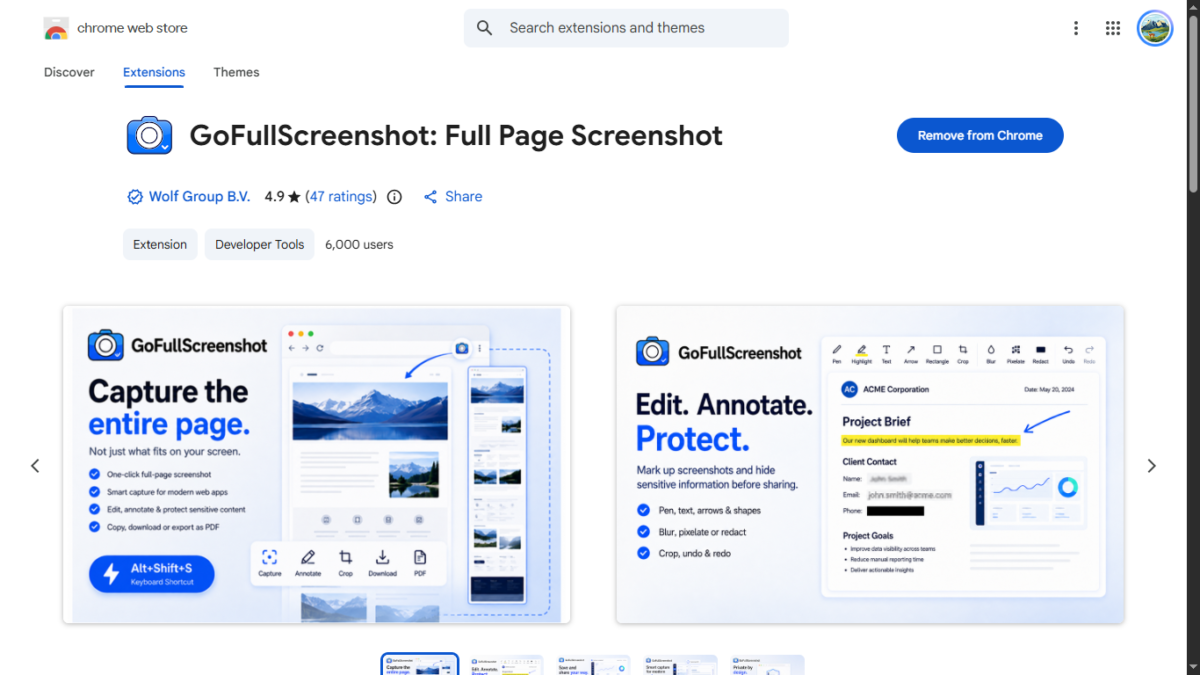
GoFullScreenshot is a Chrome extension that scrolls a page, stitches the sections together and opens the result in a new tab, where you can edit and export it. It also works in Microsoft Edge when installed from the Chrome Web Store. You can capture the full page, only the visible area, or a region you select.
On 13 October 2026, its Chrome Web Store listing showed a 4.9 rating from 47 ratings and about 6,000 users. The publisher is listed as Wolf Group B.V. Those numbers change, so check the listing for the current figures. A rating from 47 people is encouraging, but it is a small sample.
Why I didn’t recommend it at first
When I first tried the extension, Chrome showed an Enhanced Safe Browsing warning. I only want to recommend tools I trust, so I left it out. The developer later explained that the warning was related to the newness of the extension and the developer account, and that trust signals build up over time. When I installed the latest version, I saw no warning and the extension worked normally.
I am not saying Google has declared the extension safe. Chrome’s warnings are controlled by Google and can change. I am only saying that the warning I saw earlier did not appear in my latest test. Look at the listing, the permissions and the reviews yourself before you decide.
How to use it
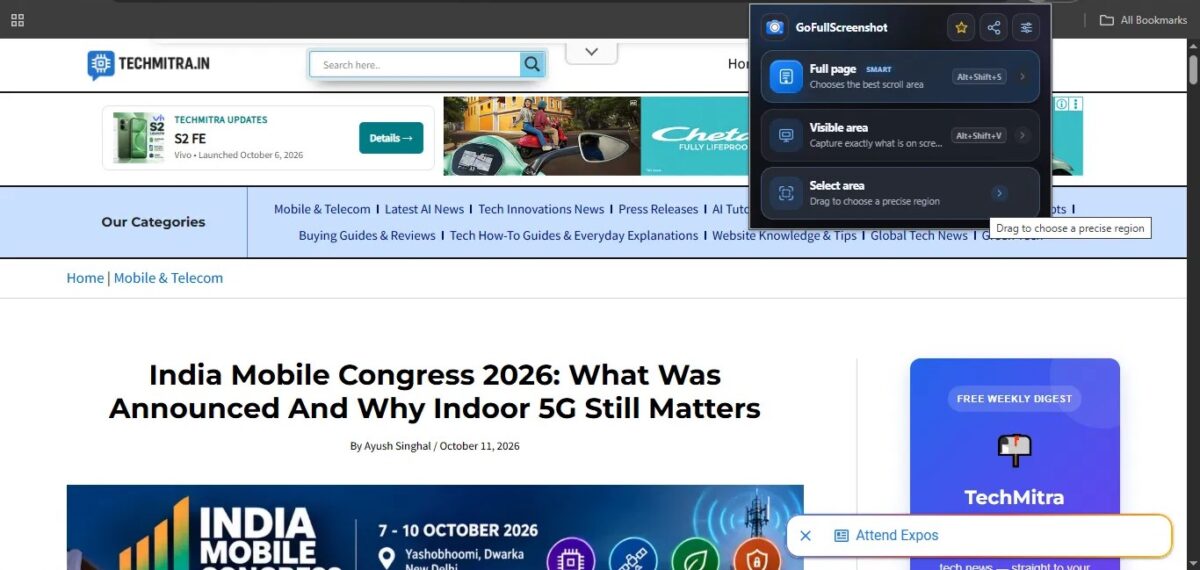
Click the extension icon and a small popup offers three modes:
- Full page (marked Smart), shortcut Alt+Shift+S
- Visible area, shortcut Alt+Shift+V
- Select area, where you drag to choose a region
Select area has no shortcut by default. You can assign one at chrome://extensions/shortcuts. After a capture, the screenshot opens in a new tab with an editing toolbar and the download options.
GoFullPage works differently. You click its icon and it starts capturing immediately, with no choice of mode. That is simpler, but you cannot pick a region or capture only the visible area.
My test: a 10,409-pixel-tall page
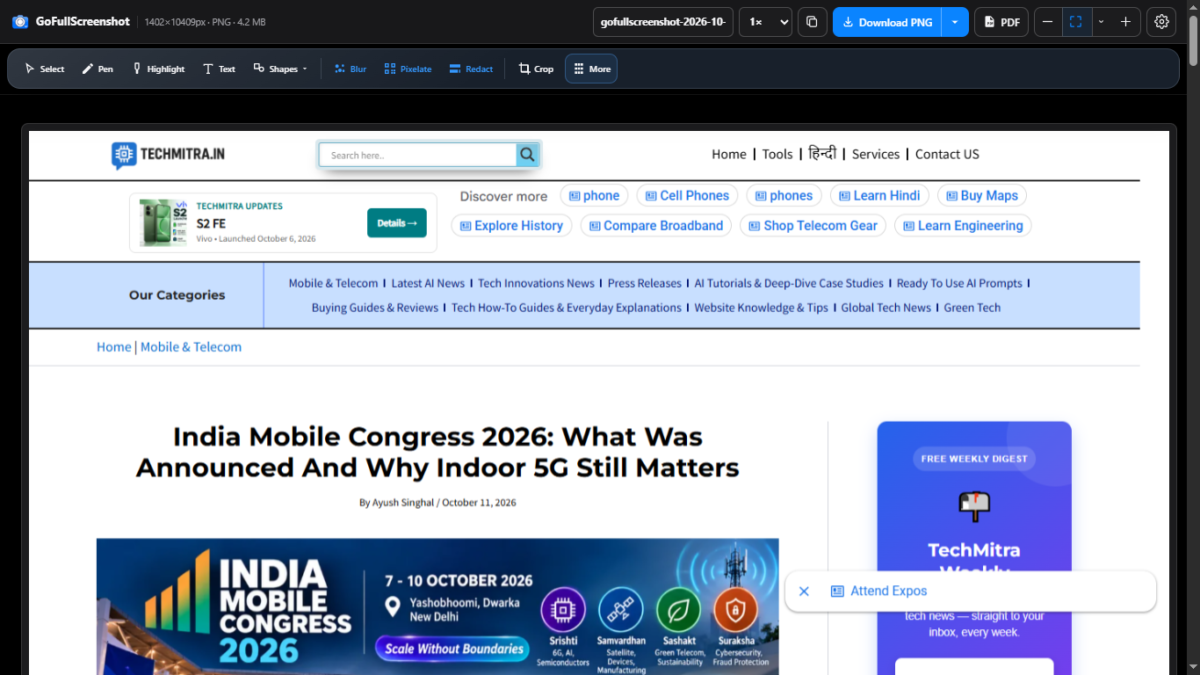
I captured one of my own long TechMitra articles with Full page. The result was a single image of 1402×10409 pixels, and I saw no visible seams between sections.
One thing showed up in the image. A floating “Attend Expos” bar from my own site appears repeatedly down the right side of the capture. It is a floating element that was on screen at each scroll position, so the extension captured it each time. Any tool that scrolls and stitches can do this, so if you capture pages with chat widgets, cookie banners or sticky bars, check the result. It happened again in a later capture, where a floating ad on my page repeated more than a dozen times down the image. That makes a capture of an ad-heavy page look cluttered, so if your pages have sticky ads, you may want to check them before you capture.
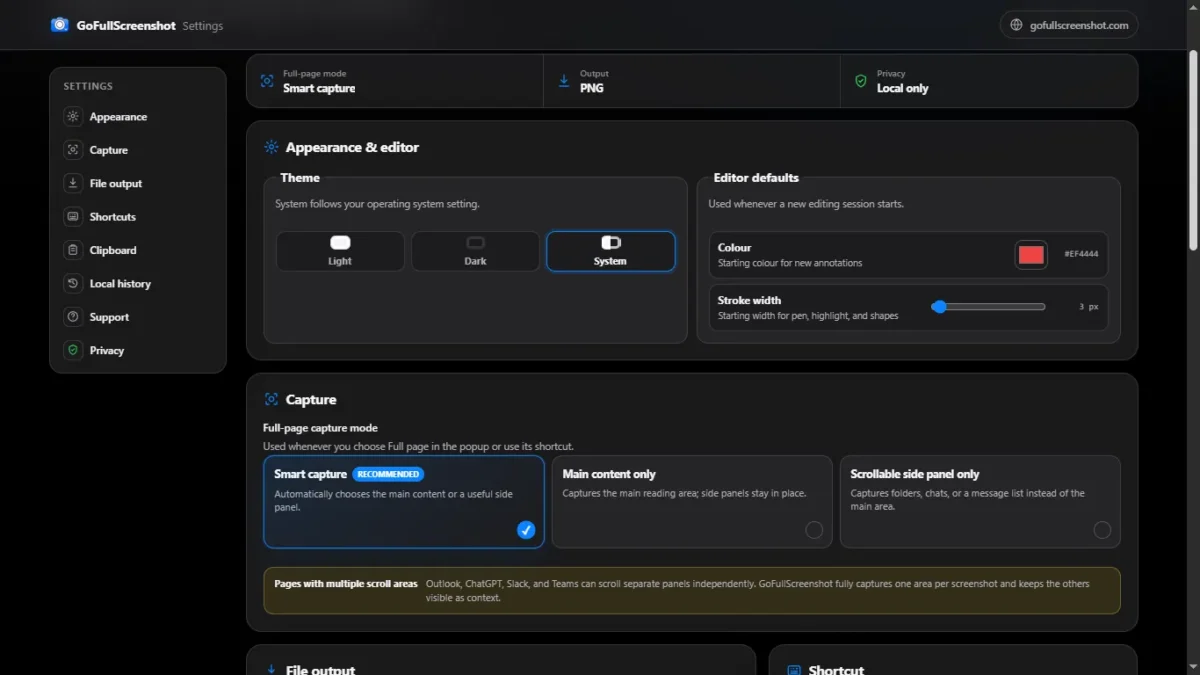
Under Full page there are three settings: Smart capture (the default), Main content only, and Scrollable side panel only. On apps where several panels scroll separately, such as ChatGPT, Slack or Outlook, the extension captures one scrolling area per screenshot and leaves the others as they appear on screen. I ran into this in my very first test on a chat page, when the sidebar was cut off. At first I took it for a flaw, but it is how the tool is designed. If you want the sidebar, switch to the side panel mode.
Export formats and file sizes
Because I run websites, file size matters to me, so I exported the same capture in every format. These are the sizes from my computer’s file properties:
| Format | File size |
|---|---|
| PNG | 3.27 MB |
| JPEG | 2.13 MB |
| WebP | 1.34 MB |
| 2.24 MB |
PNG is the default. In my test, WebP came out about 59% smaller than PNG and about 37% smaller than JPEG. For a blog with many screenshots, that is a useful saving, because smaller images help pages load faster. If you publish WebP screenshots, zoom in to 100% first to make sure small text is still sharp.
A few things to keep in mind:
- This is one page, tested once, at the default settings. The developer says JPEG and WebP quality can be adjusted and that export scale can be set to 0.5x, 1x or 2x, which could change these numbers.
- The PDF is a single, very tall page, and it is a flattened image. I tried to select and copy text from it and could not. It is good for sharing or archiving a page as one file, but not for searchable text.
- Very tall captures can optionally be downloaded as numbered parts of 3000, 4000 or 5000 pixels, with a 160-pixel overlap so text is not cut in half. I have not tested that option.
Editing tools
Editing is one of the main reasons to choose this extension, so it deserves a closer look. The editor opens in the same tab right after each capture. The developer says it needs no account and no separate app. From the toolbar and the extension’s description, these are the tools:
- Select, to move and adjust the marks you have added
- Pen and Highlight, for freehand marks and for highlighting text
- Text, with font and formatting controls
- Shapes, including lines, arrows, rectangles and ellipses
- Blur and Pixelate, to obscure details
- Redact, to cover details with a solid block
- Crop, to trim the capture
- Eraser, undo and redo, plus zoom, fit, fullscreen and pan controls
- A Settings option for the starting annotation colour and stroke width. In my Settings it was red at 3 px.
I tried the editor on a fresh capture of the same article (this one came out at 1366×9836 pixels). I drew a freehand mark with Pen, put a semi-transparent highlight over a word, added a text label, drew an arrow and a rectangle around a phrase with Shapes, and blurred a word with Blur. Each tool did what I expected.
A few details I noticed along the way:
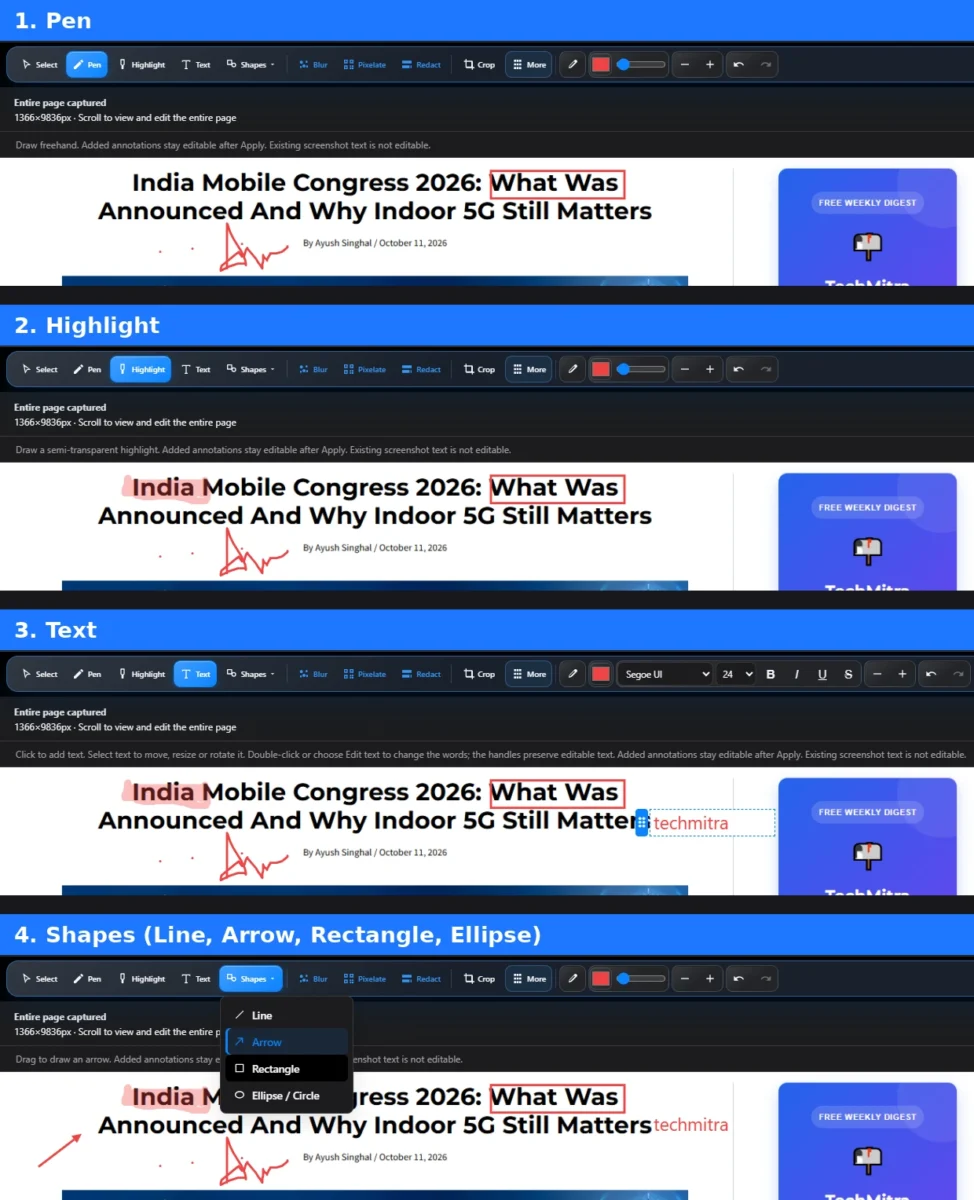
- Text uses a font picker (Segoe UI at size 24 by default) with bold, italic, underline and strikethrough buttons. You can move, resize and rotate the text, and double-click it to change the words.
- Shapes offers Line, Arrow, Rectangle and Ellipse/Circle.
- The toolbar has a colour picker, a stroke-width control, undo and redo, and Cancel and Apply buttons.
- The More option adds three buttons to the toolbar: Show original, Clear and Revert.
- The editor says annotations stay editable after you click Apply, but if you used a privacy tool such as Blur, Apply merges everything into the image and removes the editable layers, so the hidden content cannot be recovered. That is a sensible design, but it means you should finish your other marks first.
- Text that is already part of the screenshot cannot be edited.
After I clicked Apply, I could download the edited screenshot as a PNG, and all of my marks (the highlight, the rectangle, the text label, the arrow, the pen mark and the blur) were merged into the saved image.
I also tried the three tools that matter most for privacy and trimming:
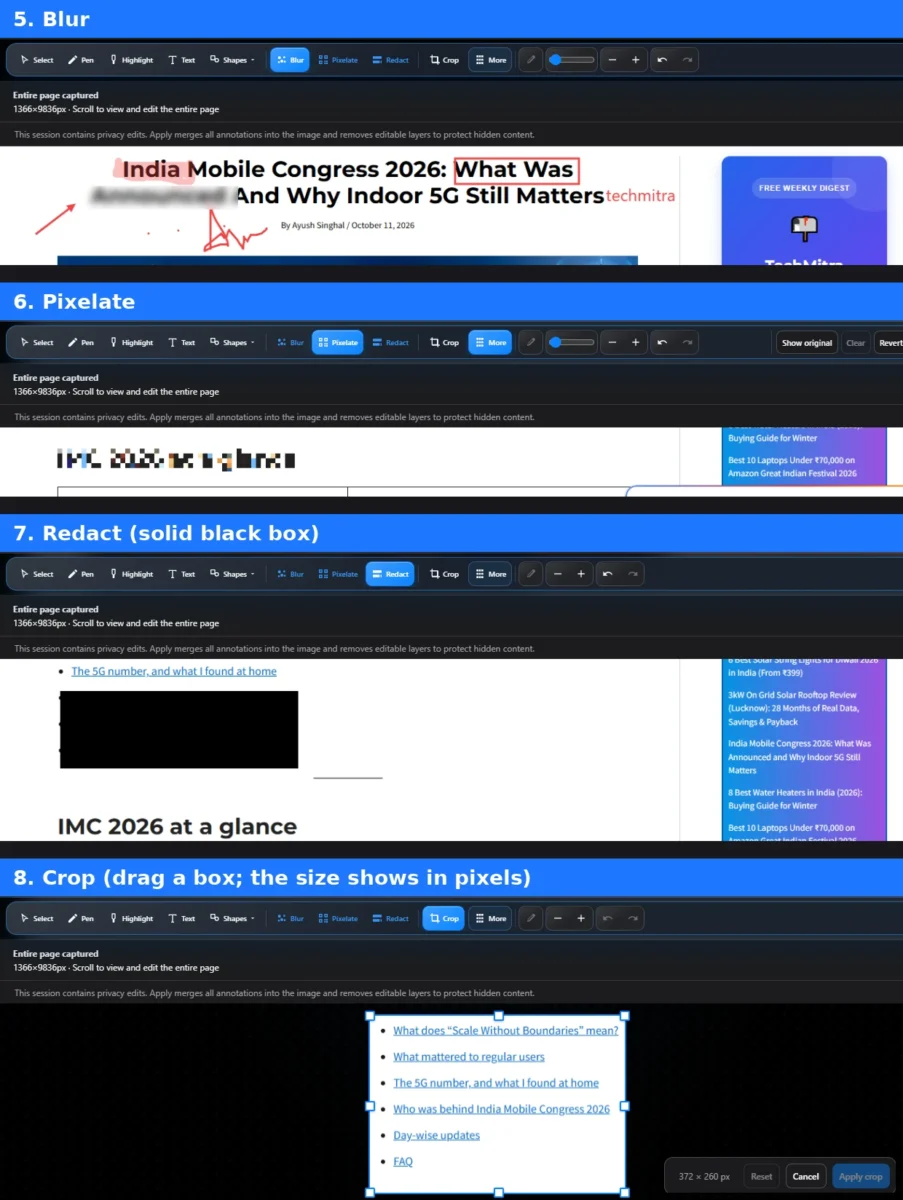
- Pixelate turned the heading I selected into coarse blocks, and I could not read it afterwards.
- Blur was softer. On the large heading text I blurred, the words were harder to read, but the shapes of the letters were still visible, so I would not trust it for anything sensitive.
- Redact drew a solid black box over the area I selected. I covered three list items in my test, and you can select any part of the article this way.
- Crop lets you drag a box over any part of the capture, shows its size in pixels (mine was 372×260), and has Reset, Cancel and Apply crop buttons. On a very tall capture, this is a quick way to keep only the section you need.
I downloaded the edited PNG and zoomed in to 259% on the redacted area. It was solid black, with no trace of the text underneath. Only the edges of the bullet points peeked out at the left, because my box started slightly to the right of them, so draw the box a little larger than the content you want to hide. As with any redaction, check the saved file yourself before you share it.
For someone who writes tutorials or reviews like me, the useful parts are simple: arrows and highlights to point at a setting, text labels for steps, and Crop to trim a very tall capture down to the section you need. For anyone who shares screenshots of customer work or admin pages, the hiding tools matter most.
One warning comes from the extension’s own description. Blur and Pixelate only obscure content visually, and they should not be treated as permanent removal. Only the solid Redact tool replaces the underlying pixels in the saved result. If you are hiding a customer’s name, an email address or a password, use Redact.
GoFullPage also has an editor, which its Premium page lists as a paid feature at $1 a month. I will cover it in a separate article.
Permissions and privacy
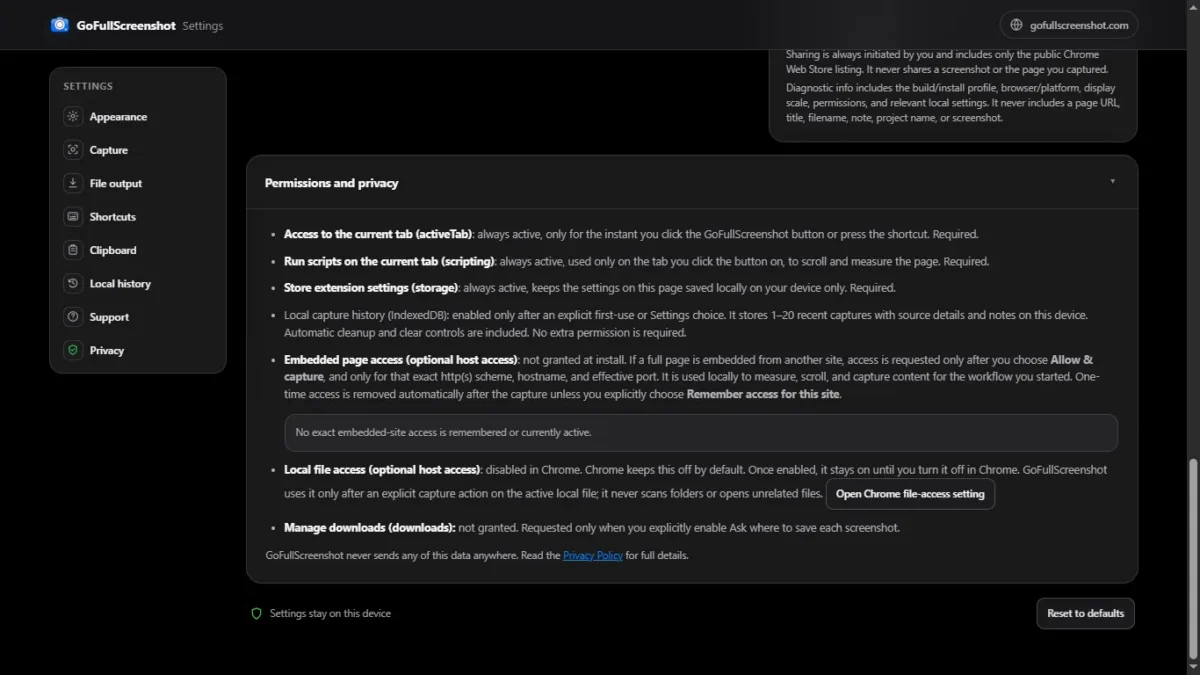
A screenshot tool can see everything on the page you capture, so permissions matter. The extension’s Settings page lists three required permissions:
- Access to the current tab, only when you click the button or press the shortcut
- Running scripts on that tab, to scroll and measure the page
- Storing settings locally on your device
Everything else is optional and off by default, including access to embedded pages from other sites, access to local files, and the downloads permission.
The developer states that capturing, stitching, editing and exporting all happen locally, that there is no backend server, no account and no analytics in the extension, and that nothing is uploaded. I did not monitor the extension’s network traffic myself, so please treat that as the developer’s statement and not something I verified.
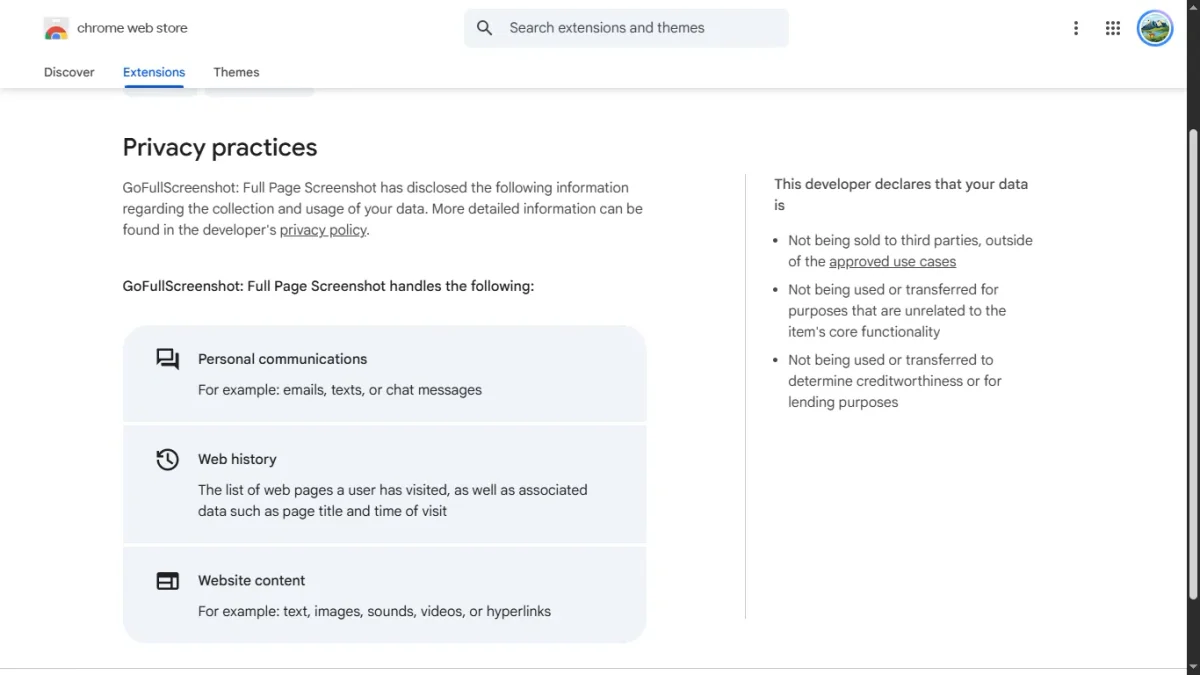
The Chrome Web Store’s Privacy practices tab lists the kinds of data the extension handles: personal communications, web history and website content. That reflects what a screenshot tool can see on the pages you capture, not data sent elsewhere. The developer also declares that the data is not sold and not used for unrelated purposes.
One more setting to know about is local capture history. It is off until you choose it, and it stores screenshots, source titles and URLs on your device, with a button to clear them. If you share a computer, leave it off or clear it regularly.
Like every extension, it also cannot capture pages that Chrome protects, such as chrome:// pages and the Chrome Web Store. Local files need Chrome’s “Allow access to file URLs” setting, and a local PDF in Chrome’s viewer supports Visible area only.
How to Install and Use GoFullScreenshot on Microsoft Edge
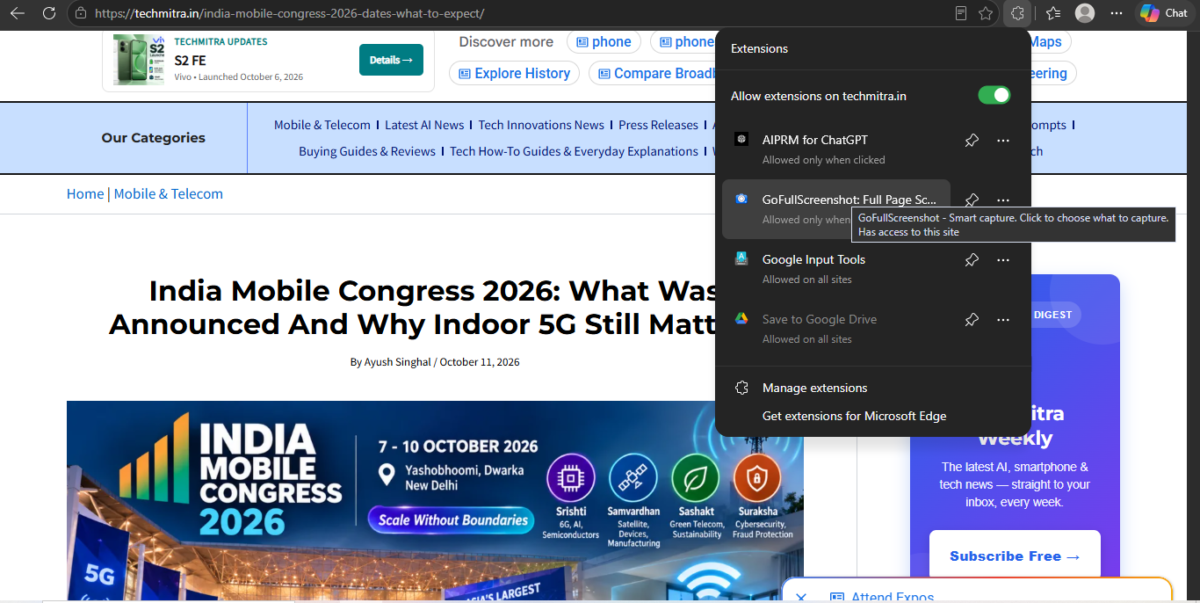
Although GoFullScreenshot is available on the Chrome Web Store, you can also use it in Microsoft Edge. Edge supports compatible extensions from the Chrome Web Store, so you don’t need to look for a separate Edge version.
Step 1: Open the Chrome Web Store
Open Microsoft Edge and visit the GoFullScreenshot extension page on the Chrome Web Store.
Step 2: Install the Extension
On the extension page, click Get or the installation button displayed by Edge. If prompted, confirm that you want to add the extension to Microsoft Edge.
Step 3: Open the Extension
Once installed, click the Extensions icon in Edge’s toolbar and select GoFullScreenshot. You can pin the extension to the toolbar for quicker access.
Step 4: Capture a Full Webpage
Open the webpage you want to capture and click the GoFullScreenshot icon. Choose Full page to capture the entire webpage, including content below the visible screen.
You can also use the available capture modes to capture the visible area or select a specific region.
Step 5: Edit and Download the Screenshot
After capturing the page, the screenshot opens in the extension’s editor. You can annotate, highlight, crop, or redact information before exporting the image in a supported format, such as PNG, JPEG, or WebP.
That’s it! You can now use GoFullScreenshot in Microsoft Edge to capture and save full webpages without switching to Chrome.
GoFullScreenshot vs GoFullPage
I used GoFullPage before, so I captured the same article with both tools. GoFullPage is simpler: one click and it starts capturing right away. GoFullScreenshot adds a popup with three capture modes and WebP export. GoFullPage has been around much longer and has millions of users, while GoFullScreenshot is new.
| GoFullPage | GoFullScreenshot | |
|---|---|---|
| Capture | One click, starts at once | Popup: Full page, Visible area, Select area |
| Formats | PNG, JPEG, PDF | PNG, JPEG, WebP, PDF, clipboard |
| PNG size (same page) | 4.33 MB | 3.27 MB |
| JPEG size (same page) | 6.87 MB | 2.13 MB |
| Editor | Paid feature, $1 a month with a free one-week trial (separate article) | Built in, free |
| Users (13 Oct 2026) | About 11 million | About 6,000 |
The captures were taken on different runs, and the page height varied slightly between them. I also used default settings in both tools, and I do not know what quality each one used. Please read these sizes as what happened in my test, not as a general rule about either tool.
GoFullPage is a proven tool, and for a quick full-page image it is hard to beat for simplicity. I am leaving its editor for a separate article. If you only need an occasional screenshot, Chrome’s own developer tools also have a “Capture full size screenshot” command, which needs no extension but has no editor.
Pros and cons
Pros
- Clean full-page capture on a very long page in my test
- WebP export, which produced the smallest files
- Free built-in editor with Blur, Pixelate, Redact and Crop
- Small set of required permissions, with the rest optional
- Smart capture for web apps with several scrolling panels
Cons
- New extension with a small user base and a short track record
- Two clicks instead of one if you only want a quick full-page image
- Select area has no default shortcut
- Floating or sticky elements, including ads, can repeat down the capture
- The PDF export is an image, so text cannot be copied
A Pro version is planned
The developer’s website says a Pro version is built and in final testing, but when I wrote this it was not available and had no price or release date. He says everything that is free today will stay free, and he offered me complimentary access once Pro is ready. I have not received it. If I write about Pro, I will say clearly that I received free access.
Who should use it?
GoFullScreenshot suits bloggers and website owners who want small WebP screenshots, developers who capture long pages regularly, and anyone who needs to hide private details before sharing a page. If you just want the quickest possible full-page image, an older, simpler tool like GoFullPage may suit you better.
What I have not tested yet
To be fair to you, here is what this review does not cover: the Visible area and Select area modes, the numbered-parts option, the image quality settings, and the extension’s network activity. I will update this article if I test them.
FAQ
Is GoFullScreenshot free? Yes. The developer says the free extension needs no account.
Does it work in Microsoft Edge? The developer says it does, when installed from the Chrome Web Store. I also tested it
Does it upload my screenshots? The developer says it does not. I did not verify this by monitoring network traffic.
Which format should I use for my blog? In my test, WebP gave the smallest file. Check the text at full size before you upload it.
My verdict
After my first attempt put me off, the latest version worked well in my tests. The combination of WebP export, a free editor and a short list of required permissions makes it a good addition to my toolkit as a website developer. Its main weakness is its age: it has far fewer users and a much shorter history than GoFullPage. I would use it for blog screenshots, and I will keep testing it on other pages.
Ratings, user counts and prices were checked on 13 October 2026 and may have changed since.

Ayush Singhal is the founder and chief editor of TechMitra.in — a tech hub dedicated to simplifying gadgets, AI tools, and smart innovations for everyday users. With over 15 years of business experience, a Bachelor of Computer Applications (BCA) degree, and 5 years of hands-on experience running an electronics retail shop, Ayush brings real-world gadget knowledge and a genuine passion for emerging technology.
At TechMitra, he covers everything from AI breakthroughs and gadget reviews to app guides, mobile tips, and digital how-tos. His goal is simple — to make tech easy, useful, and enjoyable for everyone. When he’s not testing the latest devices or exploring AI trends, Ayush spends his time crafting tutorials that help readers make smarter digital choices.
📍 Based in Lucknow, India
💡 Focus Areas: Tech News • AI Tools • Gadgets • Digital How-Tos
📧 Contact: Get in touch →
🔗 Full Bio: https://techmitra.in/about-us/