
Most guides on using Brevo with WordPress assume you’ll install something — either the official Brevo WordPress plugin, or a third-party connector like Bit Integrations or WP Fusion to route an existing form plugin (WPForms, Contact Form 7) into Brevo. This isn’t that. What follows is how I set up both my contact form and newsletter using Brevo’s own hosted forms, embedded directly with a Gutenberg HTML block — no Brevo plugin, no form plugin, no integration plugin, nothing installed on WordPress at all.
I ended up here because my previous setup, an Elementor form widget, caused more trouble than it was worth. The notification emails — the ones telling me someone had actually filled out the form — didn’t always arrive. Sometimes they came through fine, sometimes they just didn’t show up at all, and I’d only find out someone had reached out because I happened to check the entries manually.
To fix the delivery problem, I had to install a separate SMTP plugin. To deal with spam submissions, I had to add Cloudflare Turnstile on top of that. So a “simple” contact form ended up needing three separate pieces just to work reliably: the form plugin itself, an SMTP plugin for email delivery, and a captcha layer for spam.
Eventually I moved both my contact form and newsletter over to Brevo, using its own form builder and automation system — no WordPress form plugin, no separate SMTP plugin, and so far, no Turnstile either. Here’s exactly how I set it up, what it looks like in practice, and where I’d still be cautious.
Before setting up your contact form and newsletter below, it’s worth completing domain authentication (DNS) first — this ensures your emails land properly from the start. We cover the exact DNS steps, plus Brevo’s full 2026 pricing, in our follow-up article.“
Table of Contents
Also Read : How to Secure WordPress Admin Login: What I Did After Daily wp-admin Attacks
Why I Moved Away from the Plugin Based Setup
The core issues with the old setup:
- Unreliable notifications — the SMTP delivery from my own hosting wasn’t consistent, so form submissions sometimes never reached my inbox
- Extra moving parts — needed a separate SMTP plugin just to get WordPress’s default mail function to send reliably
- Spam — needed Turnstile to keep automated submissions out, which is one more script loading on the page
Brevo removes two of those three problems directly: it sends notification emails through its own transactional infrastructure (no separate SMTP plugin needed), and it has some spam filtering built in by default, so I haven’t needed to turn Turnstile back on.
A quick note on the “no plugin” claim, since it’s the whole point of this approach: even the official Brevo WordPress plugin still installs something on your site and connects via an API key. What I’m describing here skips that entirely — Brevo hosts the form, and you paste a plain embed code into a page. There’s genuinely nothing to install, update, or maintain on the WordPress side.
Step One: Authenticate Your Domain and Set Up a Sender
Before you can build any form or send a single email, Brevo requires this step — it’s actually the first thing it asks you to do when you set up an account.
1. Authenticate your sending domain You need to add DNS records (via your hosting provider or Cloudflare, depending on where your DNS is managed) to verify that you own the domain you want to send from. Without this, you can’t send emails using your own domain address.
2. Set up your sender identity
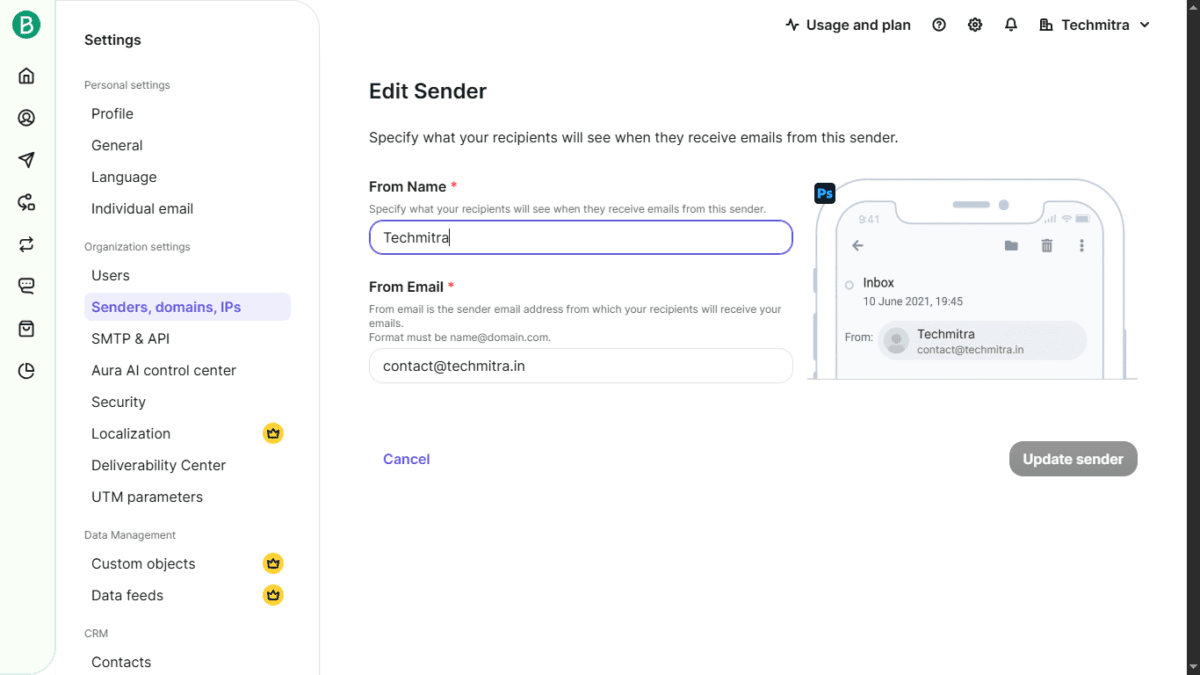
Under Settings > Senders, domains, IPs, set the From Name and From Email that recipients will see on every email Brevo sends on your behalf — whether that’s a contact form notification or a newsletter.
Once this is done, you won’t need to touch it again — every form and automation you build afterward reuses this sender.
Once your domain is authenticated, you might also want to check whether Brevo needs an SPF record too — we tested it on our own setup in our Brevo SPF DKIM setup guide.
Setting Up the Brevo Contact Form Without Plugin
Here’s the actual process I followed, start to finish.
1. Create the form In the Brevo dashboard, go to Marketing > Forms > Create sign-up form, and choose Full page embed. Give the form a name.
2. Strip it down and rebuild the fields The form opens with a basic template — I deleted the default fields and rebuilt it from scratch using the Attribute block, dragging it into the form each time I needed a new field.
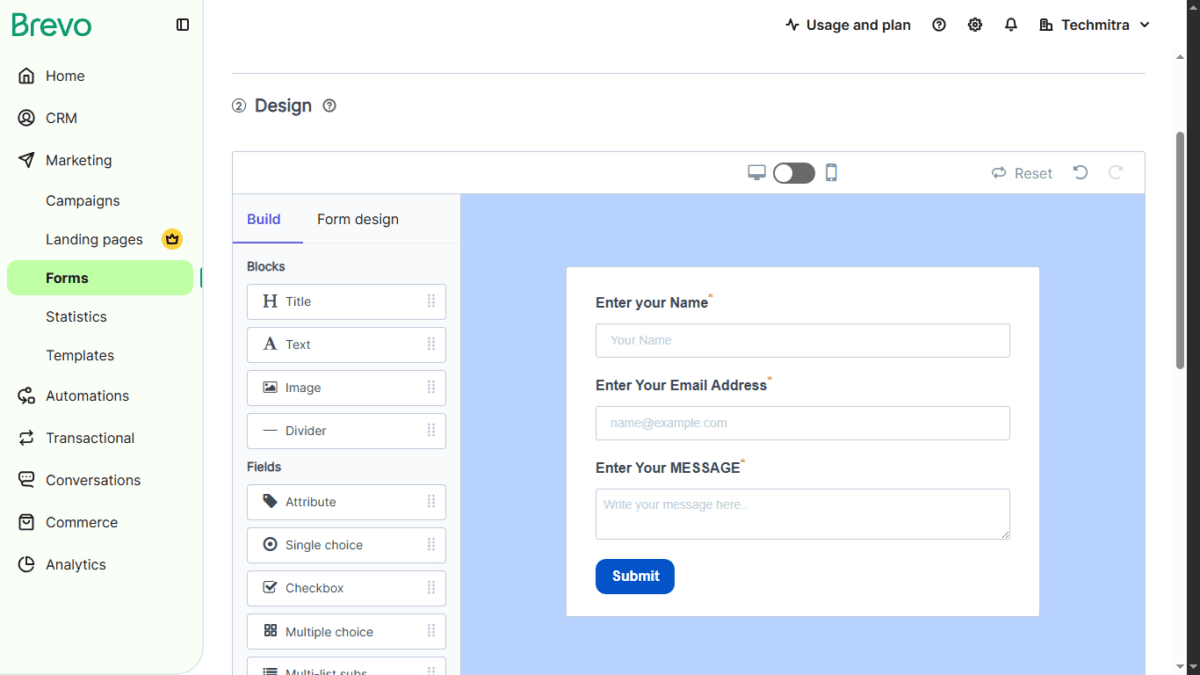
For each field, you set:
- Object type → Contact
- Attribute list → the specific attribute (FIRSTNAME, EMAIL, etc.)
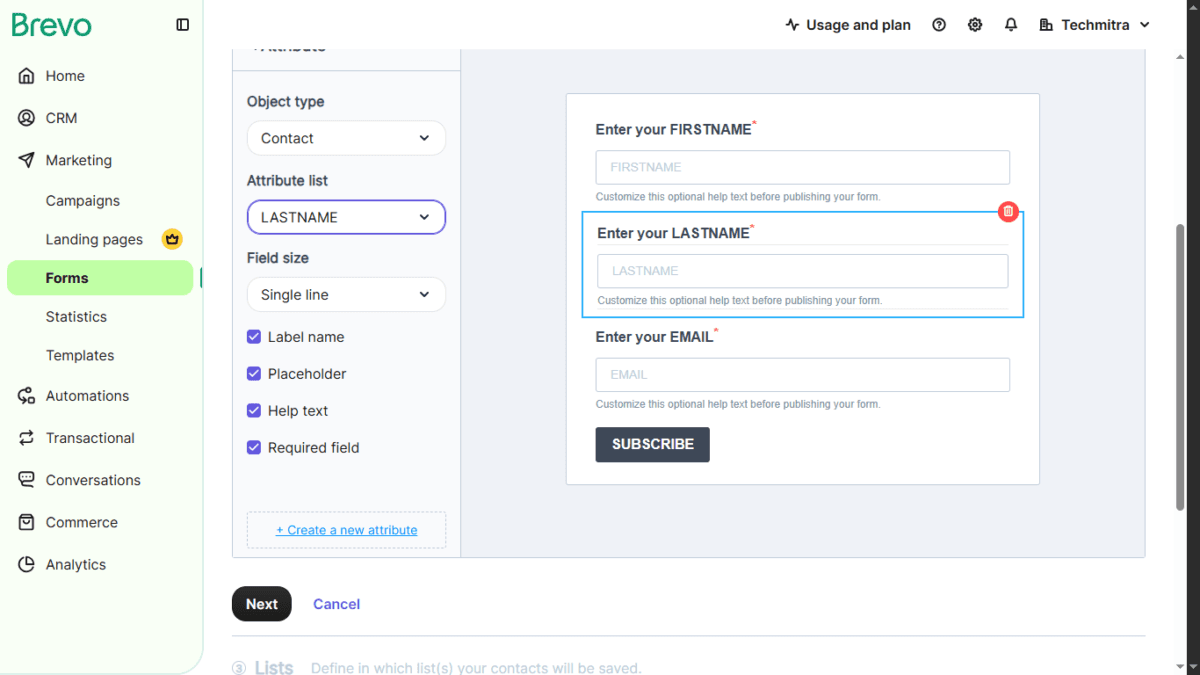
If you need a field Brevo doesn’t have by default (like a message field), you can create a new attribute for it directly from the form builder.
You can edit the label text, placeholder text, remove the help text, and mark any field as required or optional.
3. Set the contact list Every form needs a contact list attached to it — this is where all submitted data gets stored in Brevo. I created a dedicated list for contact form entries.
4. Set the confirmation behavior I set confirmation to “No confirmation email”, and instead configured a confirmation page that shows after someone submits — this avoids sending an unnecessary double opt-in email for a contact form, which doesn’t need one the way a newsletter signup does.
5. Get the embed code Brevo generates several embed options — iframe, full HTML, or a simplified HTML snippet. I used the iframe version and pasted it into a Gutenberg Custom HTML block on my Contact page. No plugin involved at any point.
At this stage, the form itself works and saves data into Brevo — but on its own, it doesn’t send you anything. For that, you need an automation.
Setting Up Email Notifications (No SMTP Plugin)
This is the part that replaces what an SMTP plugin used to do for me.
1. Create an automation Go to Automations > Create an automation.
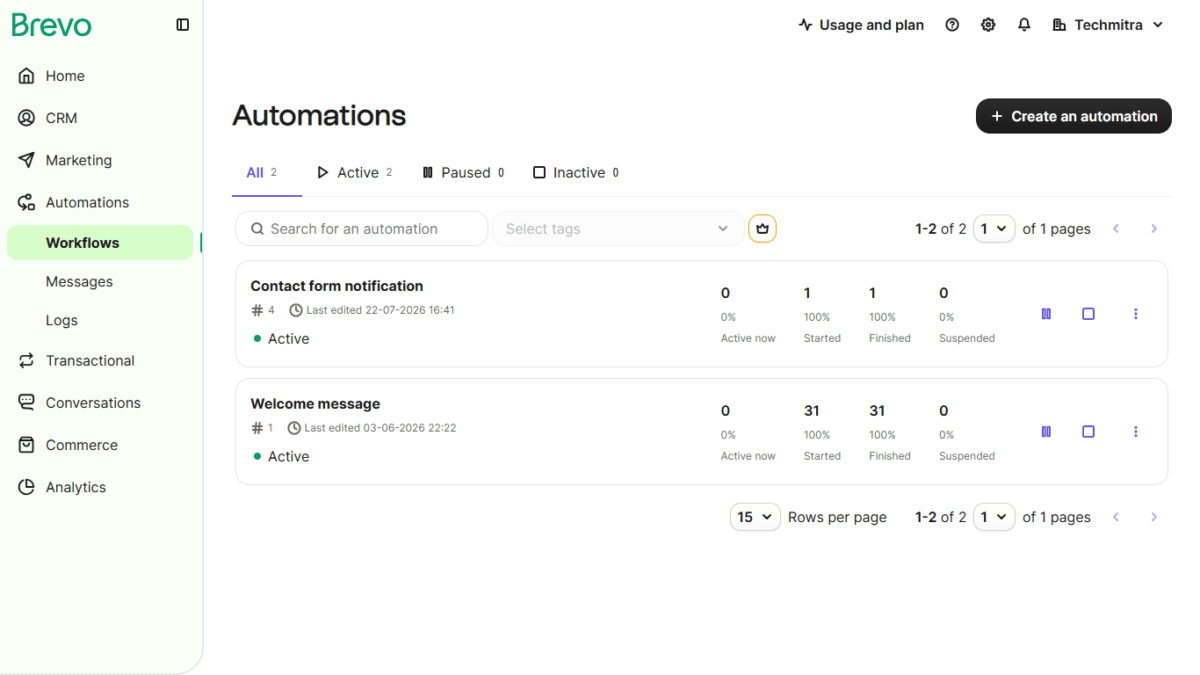
2. Set the trigger Under triggers, choose Form submitted, then select the specific contact form you created.
3. Set the action Under actions, choose Notify by email.
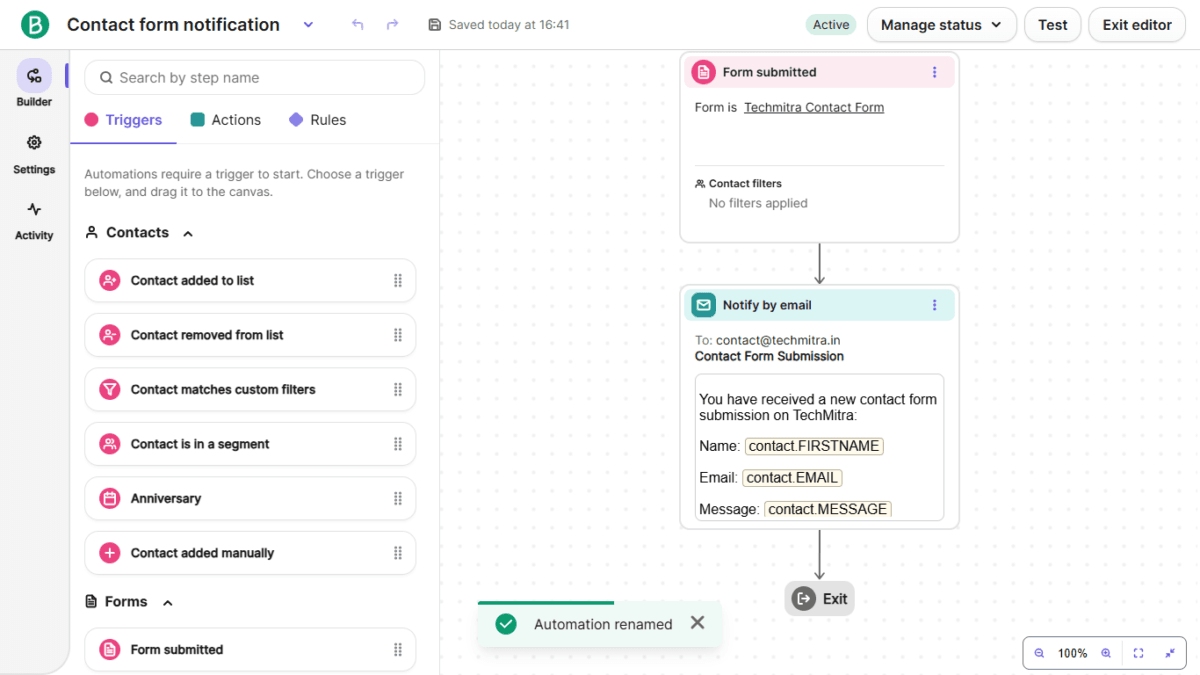
4. Fill in sender and recipient
- Sender — this uses the sender email you authenticated and set up in Step One
- Recipient — the email address you want notified. I use the same address as the sender, but you can set any address here depending on who should get contact form alerts
5. Set the notification content
For the subject line, I use:
Contact Form Submission
For the message body, I use:
You have received a new contact form submission on TechMitra:

Name: {{params.contact.FIRSTNAME}}
Email: {{params.contact.EMAIL}}

Message:
{{params.contact.MESSAGE}}
The merge tags here matter — {{params.contact.FIRSTNAME}}, {{params.contact.EMAIL}}, and {{params.contact.MESSAGE}} automatically pull in whatever the visitor typed into the corresponding fields, so each notification email is filled in with their actual submission rather than a generic template.
6. Save and activate
Once activated, the automation runs every time the form is submitted.
Does It Actually Work? Here’s a Real Test
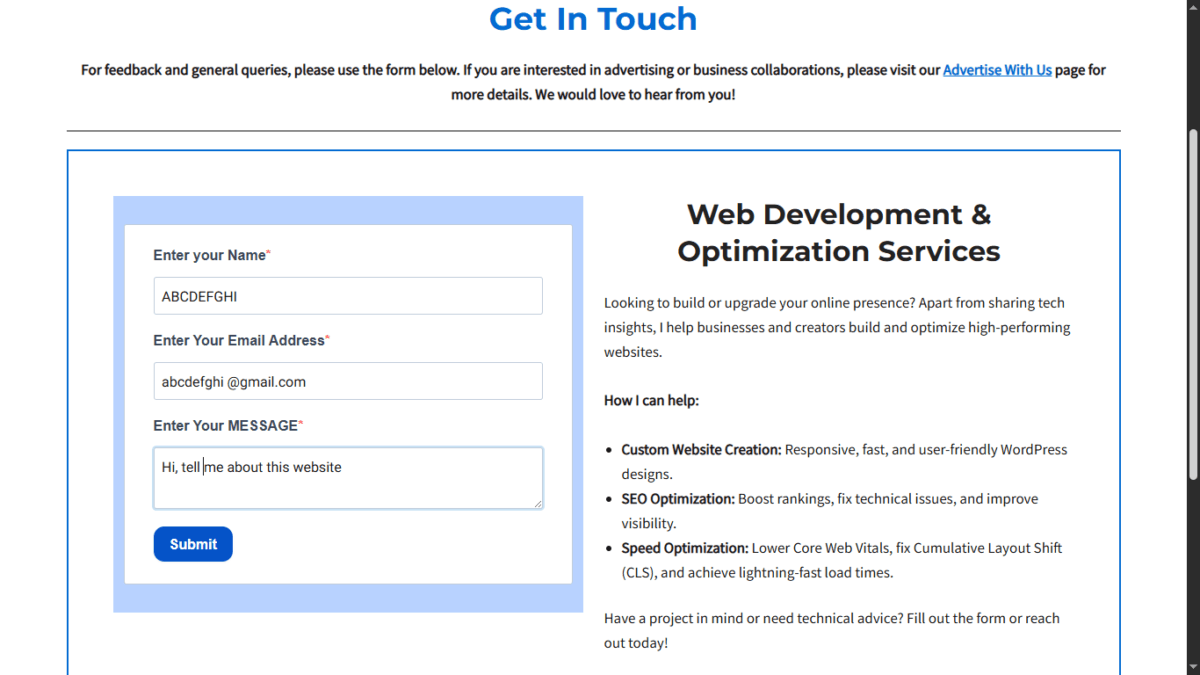
I filled out the form on the live site with a test name, email, and message.
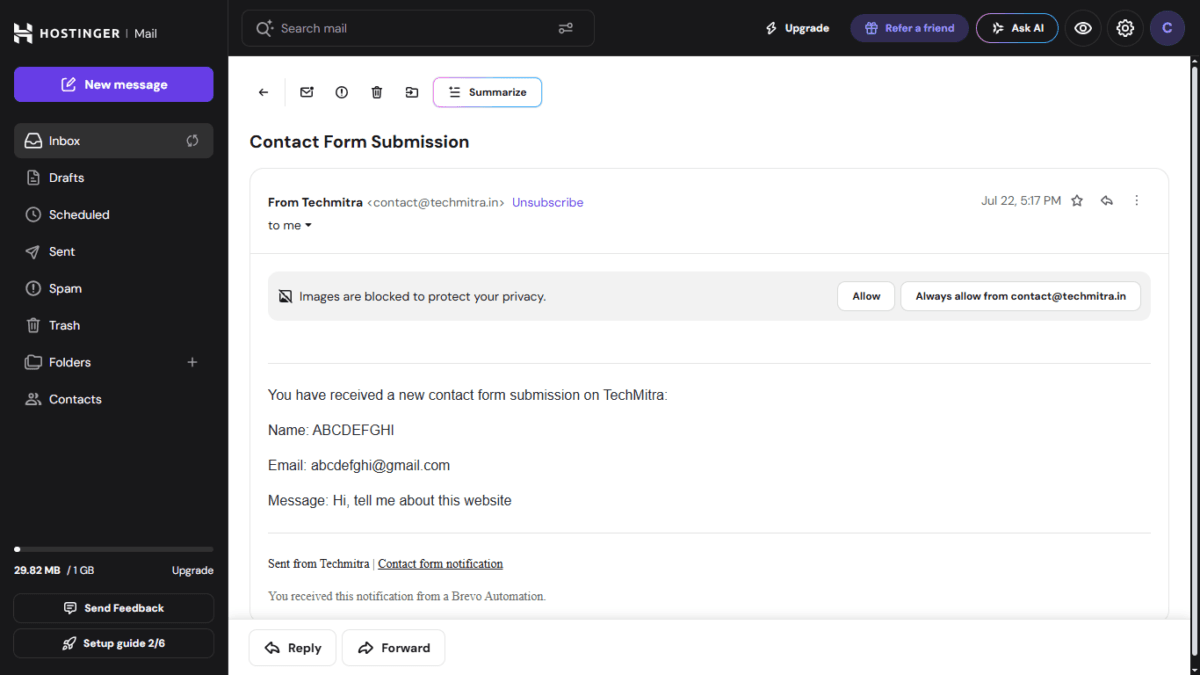
The notification arrived in under a minute, with the name, email, and message correctly pulled through from the merge tags. Since switching, I haven’t had a submission silently fail to notify me — something that happened occasionally with the old setup.
Setting Up the Newsletter (RSS Campaign)
For the newsletter, I use Brevo’s RSS campaign feature, which automatically pulls new posts from my site’s RSS feed and emails them out — rather than manually writing and sending a newsletter every time.
1. Create the newsletter form Same process as the contact form above — I just changed the heading and short title to reflect a newsletter signup instead of a contact form.
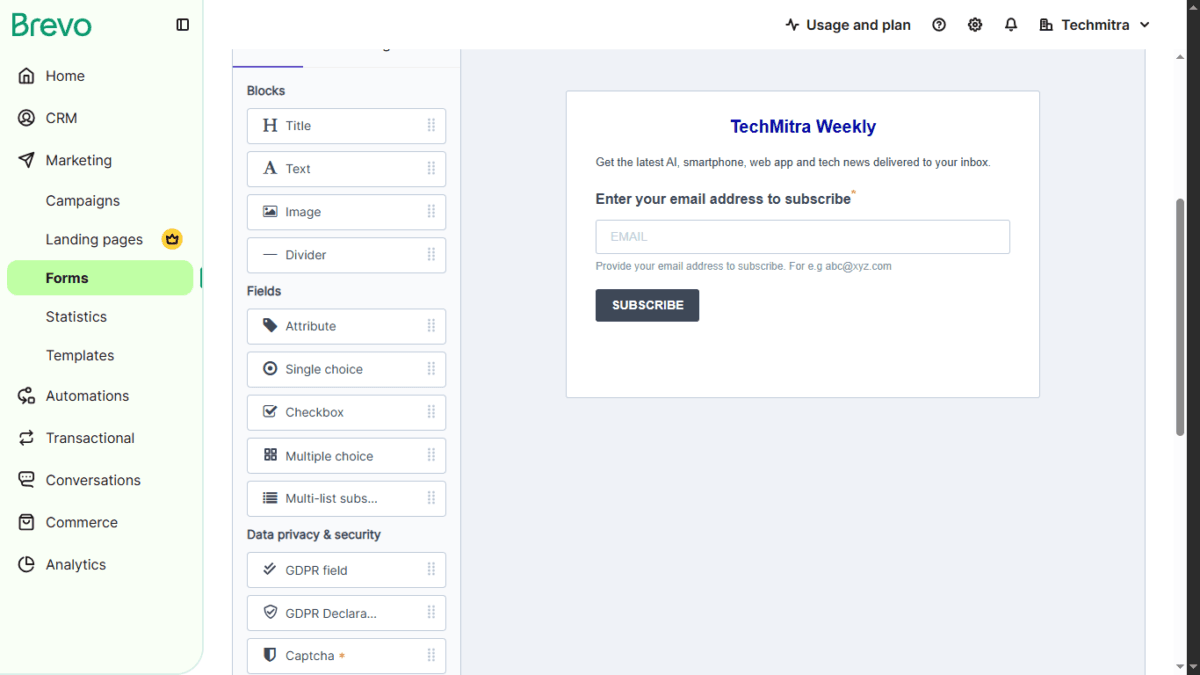
2. Set up the “new subscriber” automation
- Trigger: Contact added to a list
- List: the base list Brevo creates automatically, called “identified_contacts”
- Action: Send an email (I use this for a welcome message), then activate
3. Set up the RSS campaign Your domain and sender are already authenticated from Step One above, so this part just uses what’s already set up. Go to the workspace dropdown (top right, next to your account name) > Integrations, search for RSS Campaign, and open it. Give the campaign a name.
From there:
- Configure RSS feed — enter your website’s RSS feed URL
- Email design — I use the default template, “RSS Default Template – EN [2020]”
- Recipients — select the mailing list (I use “identified_contacts”)
- Campaign settings — campaign name, subject line, and from email (auto-filled from your sender setup)
- Schedule — set the day and time you want the newsletter to go out
- Confirm
You can customize the default template under Marketing > Templates — I’ve adjusted text, logo, and colors on mine without touching any code.
Proof It Works: A Real Digest Email
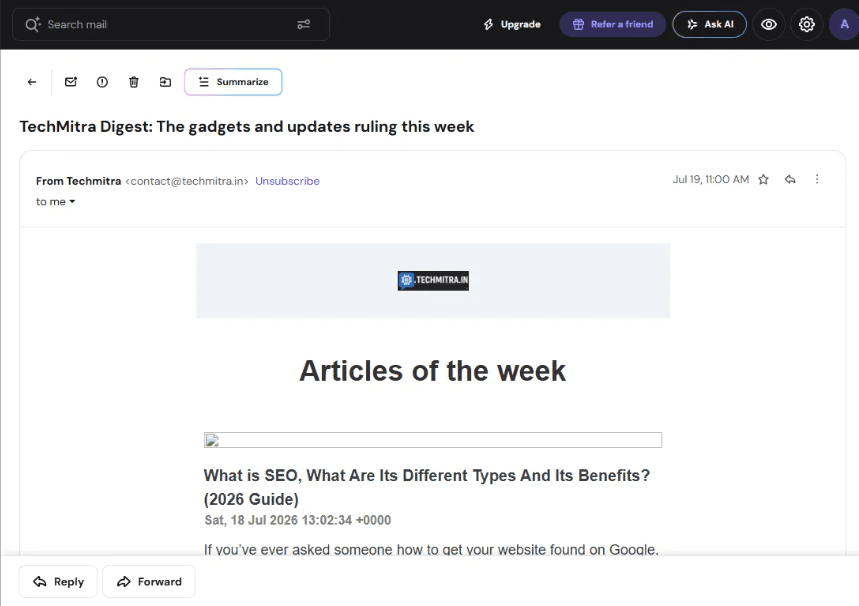
This is a real email the automation sent — it pulled in a genuinely published article automatically, with no manual composing on my part. Once it’s set up, new posts just start showing up in subscribers’ inboxes on schedule.
Works Fine Even with Aggressive Cloudflare Caching
TechMitra runs Cloudflare’s Cache Everything rule, which caches pages far more aggressively than Cloudflare’s defaults. This can cause real problems for locally-hosted WordPress forms — plugins like Contact Form 7 or WPForms rely on PHP-generated security tokens (nonces) that expire, and if a page stays cached longer than that token’s lifetime, form submissions start failing with security errors.
None of that applies here. Because the Brevo form isn’t generated by WordPress at all — it’s hosted on Brevo’s own domain and submits directly to Brevo’s API — there’s no local nonce involved for aggressive caching to break. The same goes for the newsletter signup and the RSS campaign, since neither depends on anything WordPress renders dynamically. I haven’t run into a single caching-related failure with either the contact form or the newsletter since switching, even with Cache Everything active.
Check My article on ” How Cloudflare cache everything rule helps Techmitra Improving CWV “
Privacy Considerations
Since none of this runs on your own server, it’s worth being upfront about where visitor data actually goes:
- Form submissions and subscriber data are stored on Brevo’s servers, not in your WordPress database. If keeping all data strictly on infrastructure you control is a requirement for you (for compliance reasons or otherwise), this is a meaningful trade-off to weigh.
- Brevo is a France-based company and processes data under EU data protection rules; if your audience or business has specific data residency requirements, check Brevo’s current data processing terms directly rather than assuming.
- Cross-border data transfer happens by design — a visitor in India filling out your form has their data sent to and stored on Brevo’s infrastructure, not your Indian hosting.
- If you collect newsletter signups, you’re responsible for how you represent that to users (privacy policy disclosures, consent language) regardless of which backend handles the sending.
None of this makes Brevo unsuitable — plenty of services (including SMTP plugins that route through third-party mail providers) involve similar trade-offs. But it’s different from a plugin that keeps everything in your own database, and worth stating plainly rather than glossing over.
Pros and Cons
Pros:
- No separate SMTP plugin needed — notification and newsletter emails are handled by Brevo’s own infrastructure
- No local WordPress database bloat — form entries aren’t stored in your
wp_optionsor custom tables - Built-in spam filtering meant I didn’t need Turnstile after switching
- RSS campaign automation means the newsletter sends itself once configured — no manual composing per post
- Merge tags make notification emails genuinely useful (actual submitted content, not a generic alert)
- Free tier is generous on contact storage — the daily cap only limits sends, not how many contacts you can keep
Cons:
- Free tier caps sending at 300 emails/day — if your subscriber list is close to or above that, a single campaign may take more than one day to fully deliver to everyone
- Form data lives on Brevo’s servers, not your own — a real consideration if full data ownership matters to you
- “Sent with Brevo” branding appears on free-tier emails unless you upgrade
- Domain authentication (DNS setup) is required before you can send from your own address — an extra one-time technical step for less experienced users
- You’re dependent on a third-party service being up and correctly configured — if Brevo has downtime or you misconfigure an automation, notifications or newsletters can silently stop working, so it’s worth periodically testing rather than assuming it’s still working
Who Should Use This?
Based on how this setup has actually worked for me, this approach makes the most sense for:
- Bloggers
- Small businesses
- Portfolio websites
- Affiliate sites
- Low-maintenance WordPress websites — sites where you’d rather have fewer plugins to update and fewer things that can break
It’s a weaker fit for:
- Sites needing complex conditional form logic that a simple form builder doesn’t support
- Organizations or sites that require all visitor data to stay on their own infrastructure, rather than a third-party server
- Anyone who wants zero dependency on an external service’s uptime for something business-critical
If you fall into the second group, a local plugin (paired with a properly configured SMTP plugin) is still a reasonable choice — this setup made sense for my situation, but it isn’t the right fit for every site.
Conclusion
Switching my contact form and newsletter to Brevo removed two plugins from my site (a form plugin’s SMTP dependency and Turnstile) without adding a new one in their place. The contact form now notifies me reliably — I’ve tested it and confirmed delivery in under a minute — and the newsletter sends itself through the RSS campaign whenever I publish something new, with no manual composing required.
It isn’t a completely free upgrade: your form and subscriber data now live on Brevo’s servers rather than your own, you’re capped at 300 sends a day on the free tier, and domain authentication is a one-time technical step you have to get right. But for a site like mine, where the priority was reliability and fewer moving parts rather than full data ownership, it’s held up well for months without issues.
If you’re dealing with the same unreliable-notification problem I had, this is a genuinely simpler alternative worth trying — just go in aware of the trade-offs above rather than assuming it’s a plugin-for-plugin swap with no differences at all.
FAQ
Do I need a WordPress plugin to use Brevo forms?
No. The form is built and hosted on Brevo, and you embed it on your page using a Gutenberg Custom HTML block with the iframe or HTML code Brevo generates. No plugin installation is required.
Is this different from using the official Brevo WordPress plugin?
Yes. The official Brevo plugin still installs something on your site and connects via an API key. This method skips that step entirely — there’s no plugin of any kind involved, not the official one and not a third-party connector like Bit Integrations or WP Fusion. You just paste an embed code into a page.
Do I still need an SMTP plugin if I use Brevo?
No. Brevo sends notification and newsletter emails through its own infrastructure, so a separate SMTP plugin isn’t needed for either the contact form or the newsletter.
Do I need Cloudflare Turnstile or another captcha with a Brevo form?
I haven’t needed one since switching. Brevo has some spam filtering built in by default. If you start seeing bot submissions later, you can always add a captcha layer on top.
What happens if I have more subscribers than the daily send limit?
The free tier caps sending at 300 emails a day. If your list is larger than that, expect a single campaign to take more than one day to fully reach everyone rather than all going out at once.
Is my form or subscriber data stored on my own server?
No. It’s stored on Brevo’s servers, not in your WordPress database. If keeping all data on your own infrastructure is a requirement for you, that’s worth weighing before switching.
Can I customize the newsletter email template?
Yes. Under Marketing > Templates, you can edit the default RSS template’s text, logo, and colors without touching any code.
Do I need to authenticate my domain before using any of this?
Yes — domain authentication and sender setup is the first thing Brevo asks for, and it’s required before any notification or newsletter email can send from your own address.
Disclaimer: This article is based entirely on my personal experience using Brevo on my own WordPress website, TechMitra. It is not sponsored, paid for, or reviewed by Brevo, and I have not received any compensation, free subscription, or incentive to write it. The opinions, observations, and recommendations shared here reflect how Brevo has worked for my specific setup and may differ depending on your website, hosting, and requirements. I encourage you to evaluate whether it meets your own needs before making a decision.

Ayush Singhal is the founder and chief editor of TechMitra.in — a tech hub dedicated to simplifying gadgets, AI tools, and smart innovations for everyday users. With over 15 years of business experience, a Bachelor of Computer Applications (BCA) degree, and 5 years of hands-on experience running an electronics retail shop, Ayush brings real-world gadget knowledge and a genuine passion for emerging technology.
At TechMitra, he covers everything from AI breakthroughs and gadget reviews to app guides, mobile tips, and digital how-tos. His goal is simple — to make tech easy, useful, and enjoyable for everyone. When he’s not testing the latest devices or exploring AI trends, Ayush spends his time crafting tutorials that help readers make smarter digital choices.
📍 Based in Lucknow, India
💡 Focus Areas: Tech News • AI Tools • Gadgets • Digital How-Tos
📧 Contact: Get in touch →
🔗 Full Bio: https://techmitra.in/about-us/