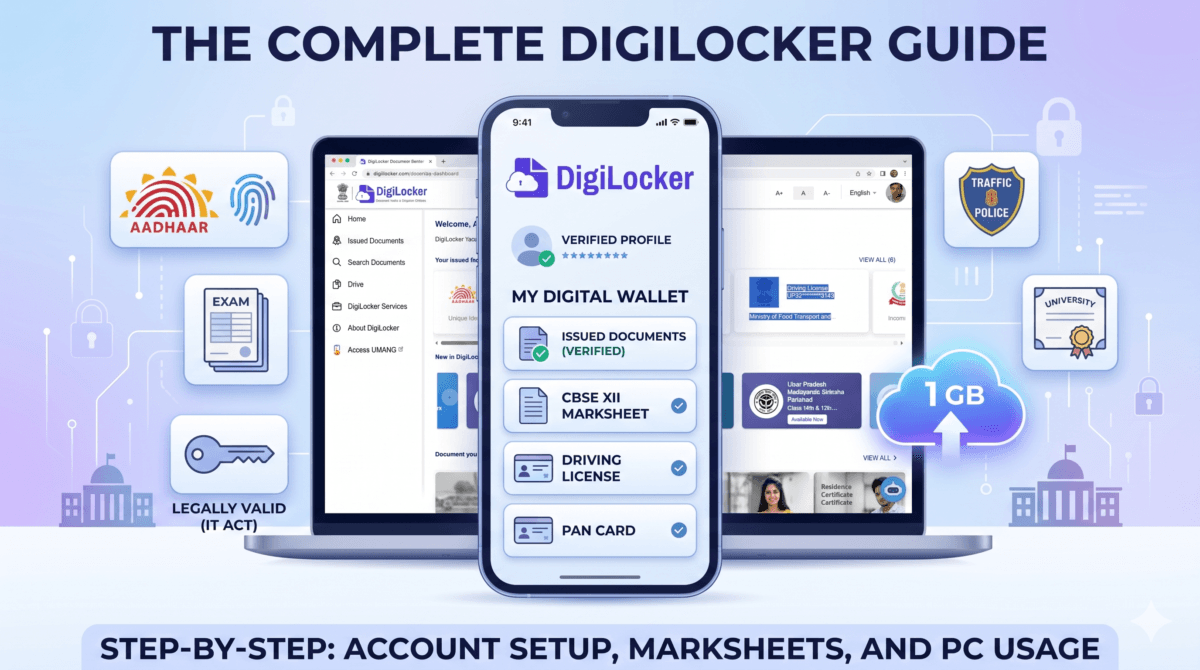
Disclaimer: The featured image and illustrative screenshots used in this article are for instructional and educational purposes only.
How to Use DigiLocker? Steps To Fetch Exam Marksheets, CKYC Card & ABC ID
Have you ever been stopped by traffic police and realized your physical driving license was sitting on your desk at home? Or have you scrambled to find your board exam marksheets while filling out an urgent university admission form?
For millions of citizens, these stressful situations are a thing of the past.
As a cornerstone of the Digital India program, DigiLocker (a flagship initiative by the Ministry of Electronics & IT [MeitY]) has completely transformed how we store, verify, and share official documents. With over 698 million registered users and 8.2 billion issued documents, it has evolved into India’s premier digital wallet.
Despite its massive popularity, one major point of confusion remains: What makes a document in DigiLocker legally valid?
In this complete, how to operate Digilocker app step by step guide—updated with the latest mobile app interface workflows—we will break down how to create an account from scratch, secure your profile, fetch official documents (including your CBSE Marksheet, CKYC Card and PAN Card), and safely leverage DigiLocker’s free cloud storage.
💡 Did You Know? DigiLocker doesn’t save files on your phone because it runs entirely on the cloud! To understand how this works without any local storage, read our guide on What is Cloud Computing in Simple Words.
At its core, DigiLocker is a secure, cloud-based platform for the issuance, storage, and verification of official documents and certificates. Launched as a flagship initiative under the Government of India’s Digital India programme, it serves as a personal digital wallet designed to completely eliminate the need for carrying physical paperwork.
Operated by the Ministry of Electronics & Information Technology (MeitY), DigiLocker provides you with a private space linked directly to your digital identity profile. Through this link, verified government departments, municipal corporations, educational boards, and private sector firms can push authentic digital certificates directly into your account.
The Core Purpose: Digital Empowerment
The fundamental goal of DigiLocker is ‘Digital Empowerment’. It builds an ecosystem of paperless governance by transforming your smartphone or laptop into a secure vault. Whether you are passing through airport security checkpoints, getting pulled over by traffic police, applying for a college admission, or opening a bank account, DigiLocker allows you to instantly prove your credentials with zero physical touchpoints.
Is it Legally Valid?
Yes, absolutely. The most critical aspect of DigiLocker is its legal backing. Under Rule 9A of the Information Technology Rules, 2016, all digitally issued documents available inside the DigiLocker system are explicitly deemed to be at par with original physical documents. This statutory recognition ensures that any document fetched directly from an official issuer into your app carries the exact same legal weight as a physical paper certificate stamped by an authority.
The Golden Rule: “Fetched” vs. “Uploaded” Documents
Before opening the app, you must understand how DigiLocker works legally. The platform contains two entirely separate sections:
Issued Documents (Legally Valid): These are digital documents fetched in real-time directly from the source of truth (such as the CBSE, RTO, or Income Tax Department). Under Rule 9A of the Information Technology Rules, 2016, these issued documents are legally deemed on par with original physical documents. They are digitally signed, timestamped, and universally accepted by traffic police, airport security (CISF), and railways.
Uploaded Documents (DigiLocker Drive): This is your personal 1.0 GB digital vault. You can upload scans or camera photos of legacy documents (like old certificates or medical bills). While incredibly useful for personal storage, self-uploaded files do not carry legal validity because they are not verified directly by an official issuing authority.
Step-by-Step: How to Create Your DigiLocker Account
Setting up your account takes less than five minutes. For the most seamless registration experience, ensure you have a smartphone with a stable internet connection and access to the mobile number registered with your identity documents.
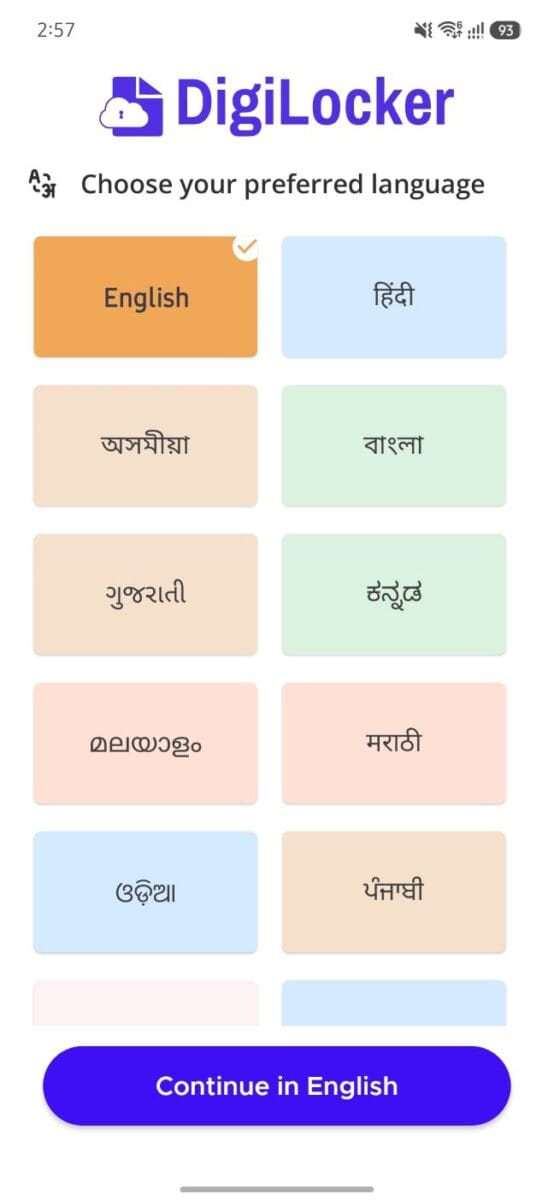
Step 1: Download and Choose Your Language
Download the official DigiLocker app from the Google Play Store or Apple App Store. Launch the app. The first screen will prompt you to select your preferred regional language (e.g., English, Hindi, Bengali, etc.). Select your language and tap “Continue in English” (or your chosen language).
Step -1 Select language
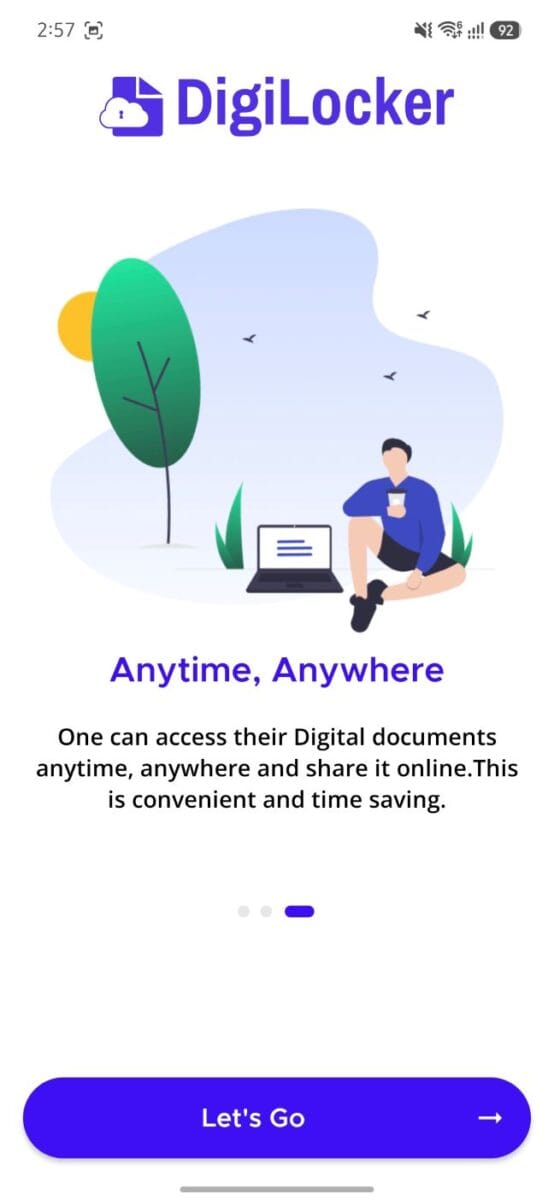
Step 2: Navigate the Onboarding Feature Walkthrough
The app will display a sequence of informational slides detailing its core capabilities. Swipe through these screens until you see the final onboarding page highlighting the convenience and time-saving aspects of digital access. Tap the purple “Let’s Go” button at the bottom.
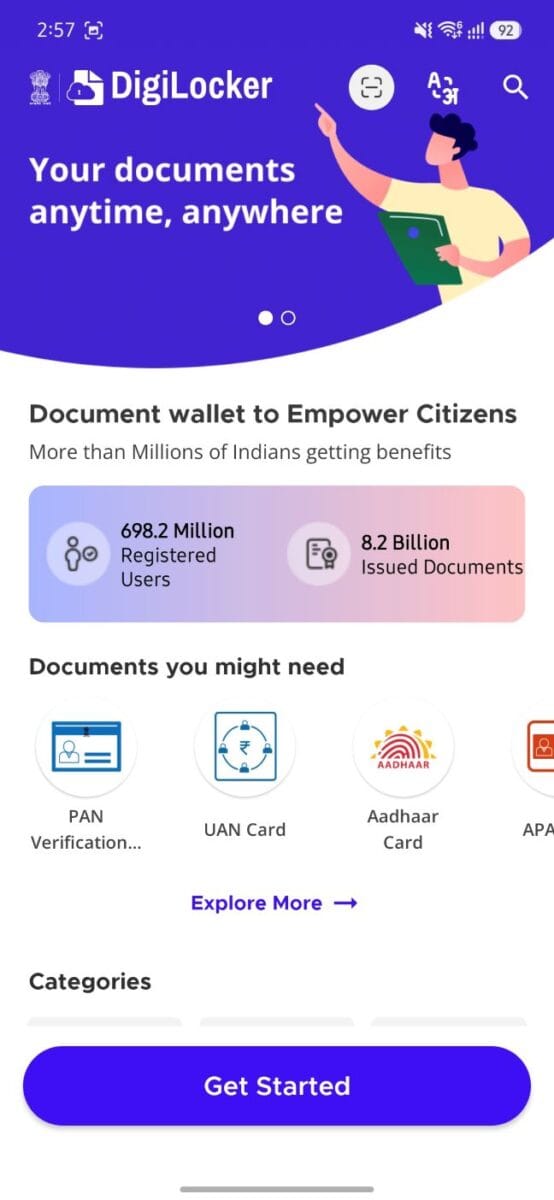
Step 3: Access the Dashboard Launchpad
You are now on the main app dashboard. To begin the formal registration or login workflow, tap the large, prominent purple “Get Started” bar located at the bottom of your screen.
Step -2 Click Let’s GO
Step 4: Verify Your Active Mobile Connection
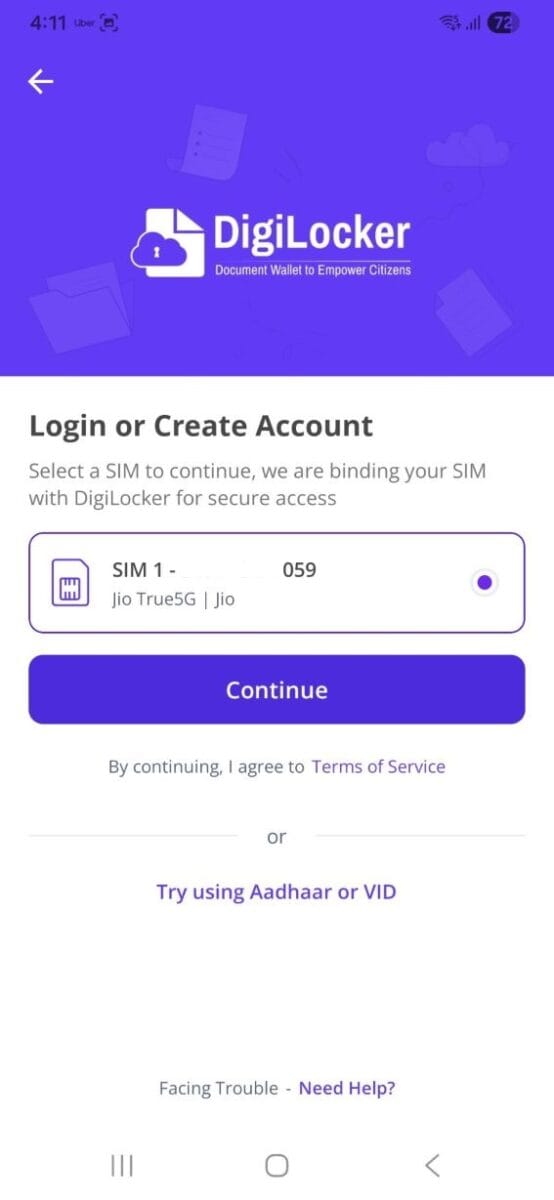
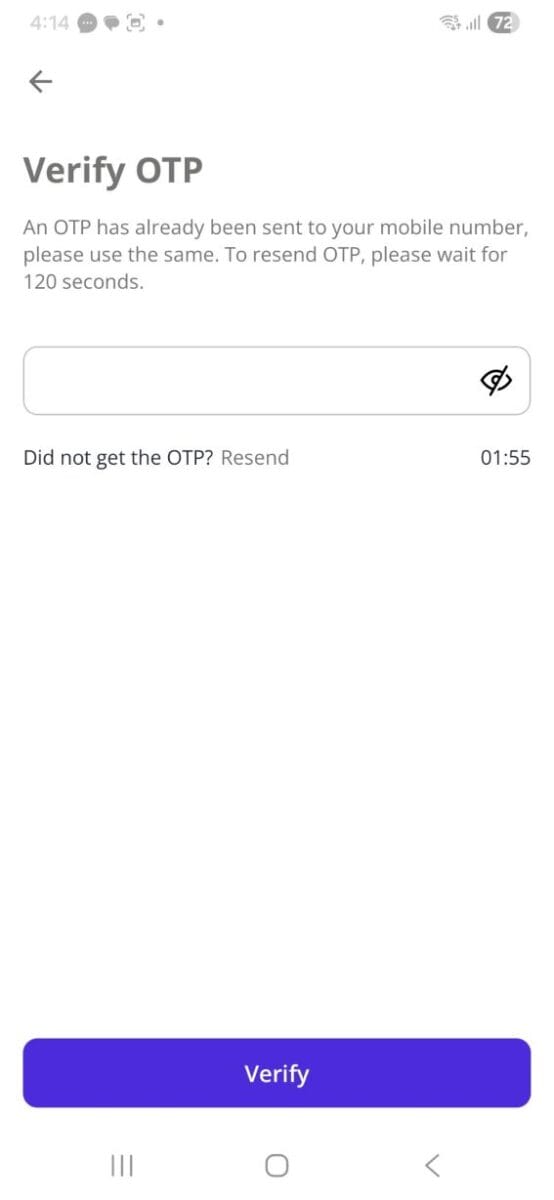
The app securely binds your active SIM card to your digital wallet. Select the appropriate SIM card slot containing your registered mobile number and tap “Continue”. The system will automatically transmit a secure text validation. Input the 6-digit numeric verification code into the designated field on the “Verify OTP” screen and tap “Verify”.
Fill Aadhaar Card registered Mobile NUmberFill OtP
Step 5: Link and Authenticate Identity
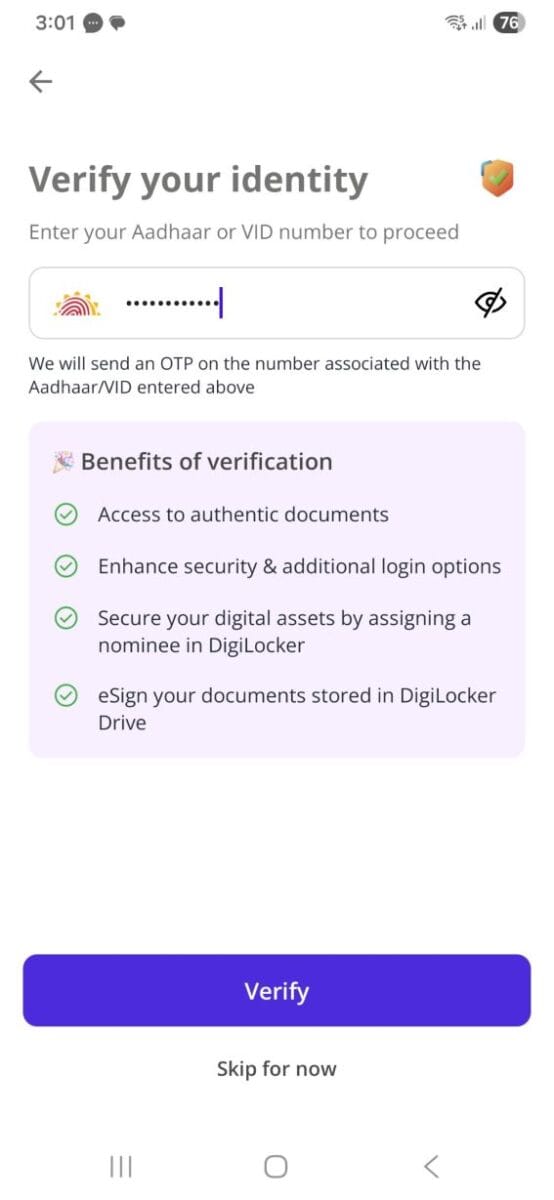
To unlock official document fetching, you must bind your identity profile. On the “Verify your identity” page, input your unique 12-digit identity card number into the input slot and press “Verify”. The application will initiate a secure verification sweep via an interactive face authentication scan or a secure identity OTP sent to your linked smartphone number. Input the incoming validation code to complete identity synchronization.
Verify Idetity By Filling Aadhaar Number
Step 6: Define Your Secure 6-Digit PIN
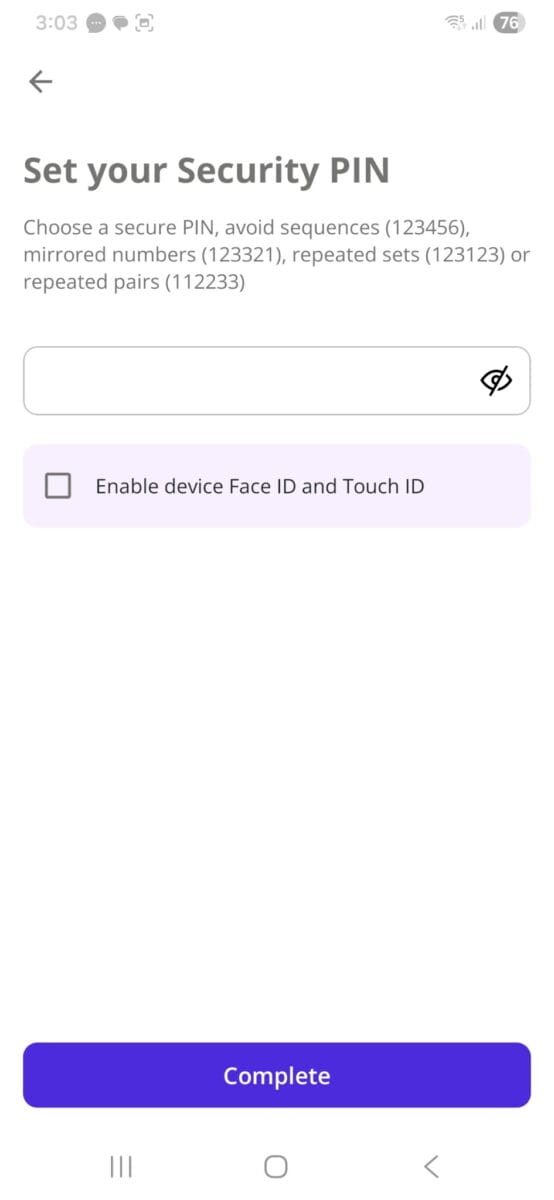
To safeguard your sensitive data from unauthorized local access, the app requires you to establish a personal security gateway. On the “Set your Security PIN” page, enter a memorable 6-digit passcode.
Set 6 Digit Security Pin
💡 Blogger Tip: Avoid obvious patterns like 123456, mirrored numbers like 123321, or repeating couples like 112233. For enhanced biometric security, toggle the “Enable device Face ID and Touch ID” checkbox to allow instant biometric logins later. Tap “Complete” to finish account creation.
How To Fetch Marksheet From Board To Digilocker (Step-by-Step)
Once your account registration is complete, your primary ID is automatically populated onto your dashboard. Retrieving your academic records from central or state boards takes just a few clicks:
Step 1: Search for Your Educational Board
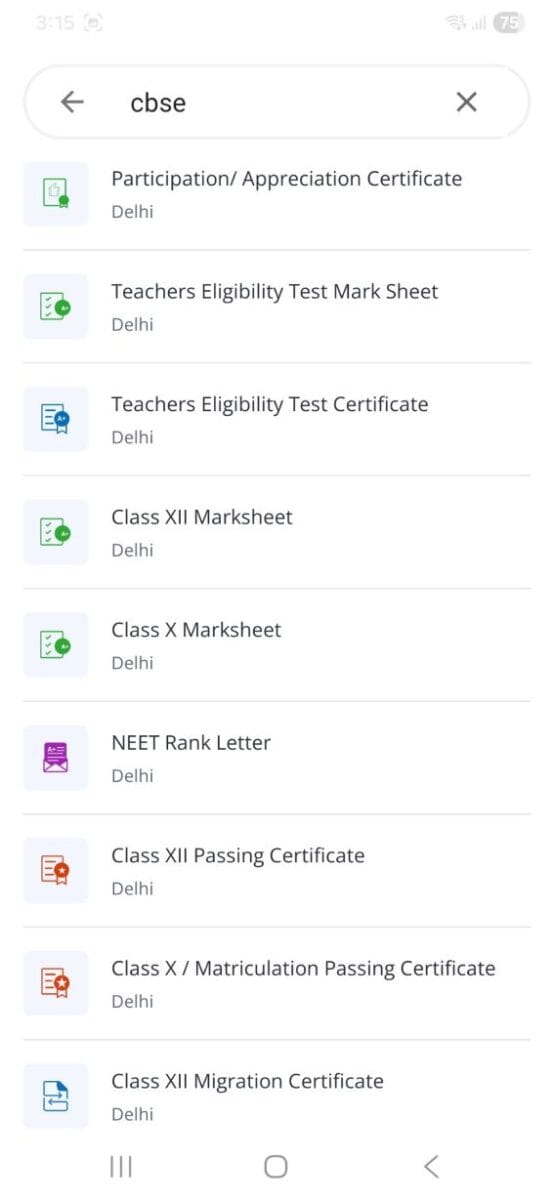
Tap the search icon on your DigiLocker app home screen. In the search bar, type your board name (for example, “cbse” or your specific state board like “UP State Board”). A dynamic list of available documents will appear instantly.
Search CBSE or any board to open marksheets.jpg” to see the list of available certificates, including Class X & XII Marksheets, Migration Certificates, and Passing Certificates.
Step 2: Select Your Required Certificate
From the search results, tap on the document you need—such as “Class X Marksheet” or “Class XII Marksheet”.
Step 3: Enter Your Exam Details
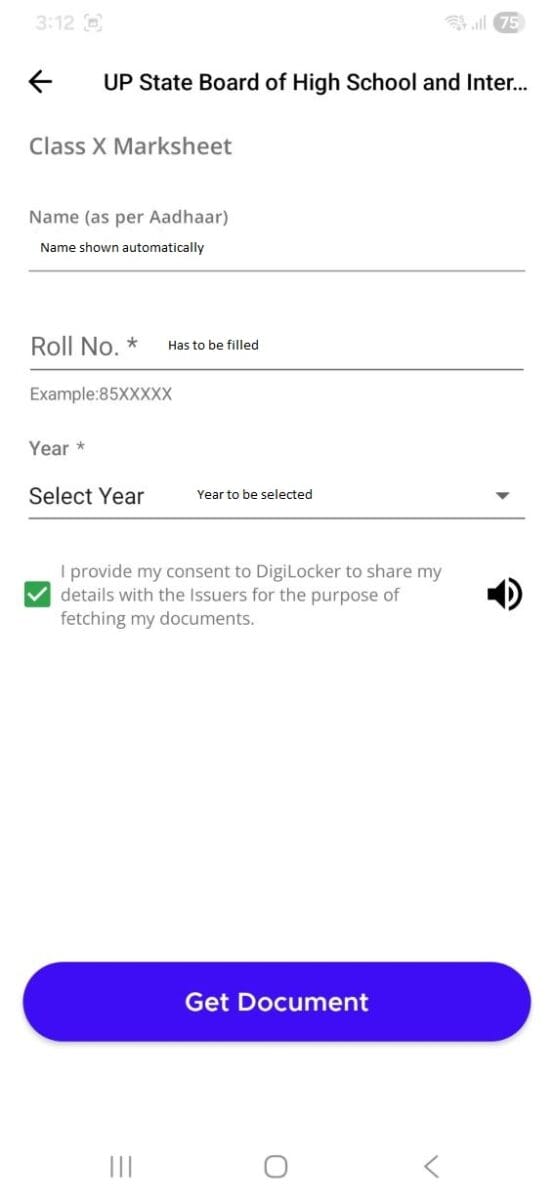
Details to fill for fetching marksheet
The app will open a secure data form. Your legal name is pre-filled automatically based on your Aadhaar profile records.
Roll No: Type your official board exam roll number into the required field.
Year: Tap the drop-down menu to select the exact year you passed your exams.
Step 4: Access and Save Your Verified Document
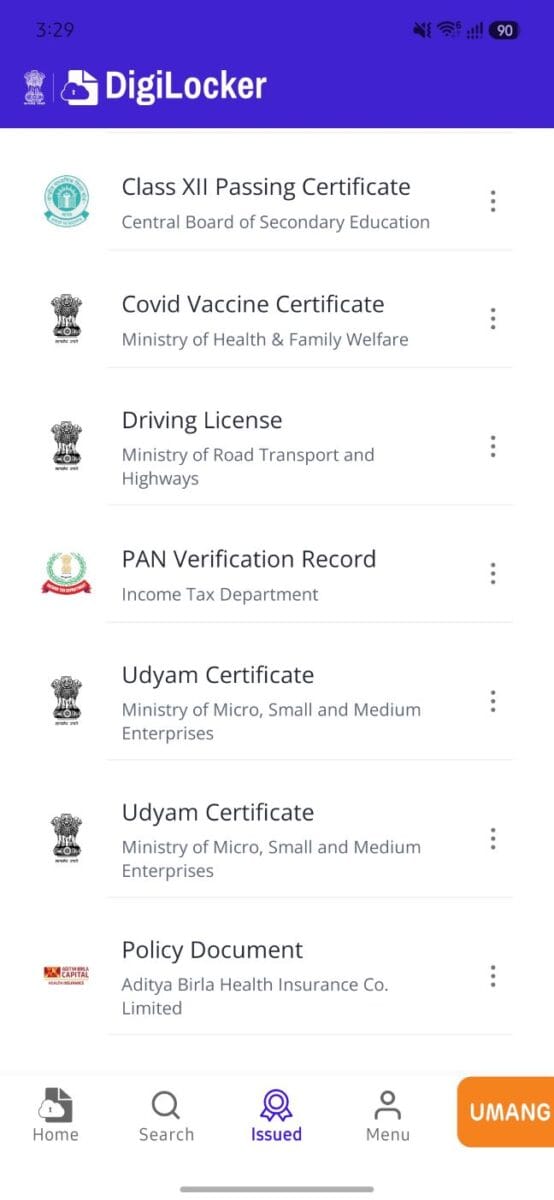
Ensure the required legal consent checkbox is ticked to authorize data matching. Tap the large purple “Get Document” button at the bottom. DigiLocker will securely fetch your verified, digitally signed marksheet directly from the board’s official repository, automatically storing it under your “Issued Documents” tab for permanent, legal use.
My Issued Documents Dashboard
How to Fetch CKYC Card On DigiLocker (No CKYC Number Required!)
If you have ever invested in the Indian stock market, opened a mutual fund account, or completed a formal verification with a financial institution, your data is likely registered with the Central KYC Registry (CERSAI).
Instead of waiting for a physical letter or trying to hunt down a forgotten 14-digit reference code, you can instantly fetch your digitally verified CKYC Card right inside DigiLocker using your regular identity details. This serves as an officially valid document (OVD) universally accepted across banks, insurance companies, and mutual fund houses.
Step-by-Step CKYC Retrieval Workflow:
Step 1: Search for the Central Registry
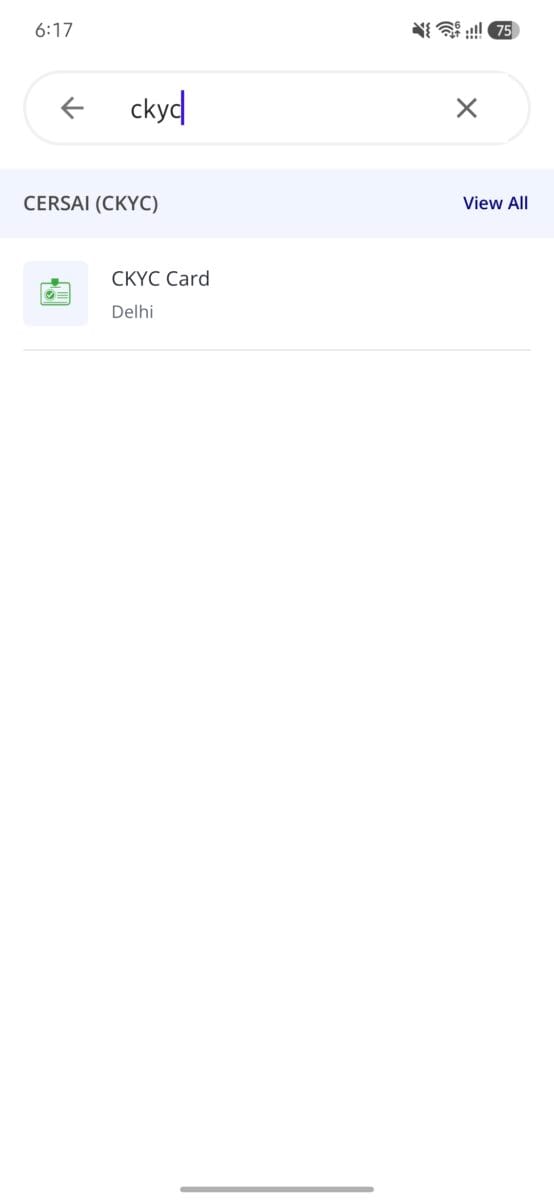
Open your DigiLocker app, navigate to the Search tab, and type “ckyc” into the search directory bar. Under the CERSAI (CKYC) department heading, tap on “CKYC Card”.
Search CKYC In Search Box In Digital Locker
Step 2: Fill Out the CKYC Fetching Form
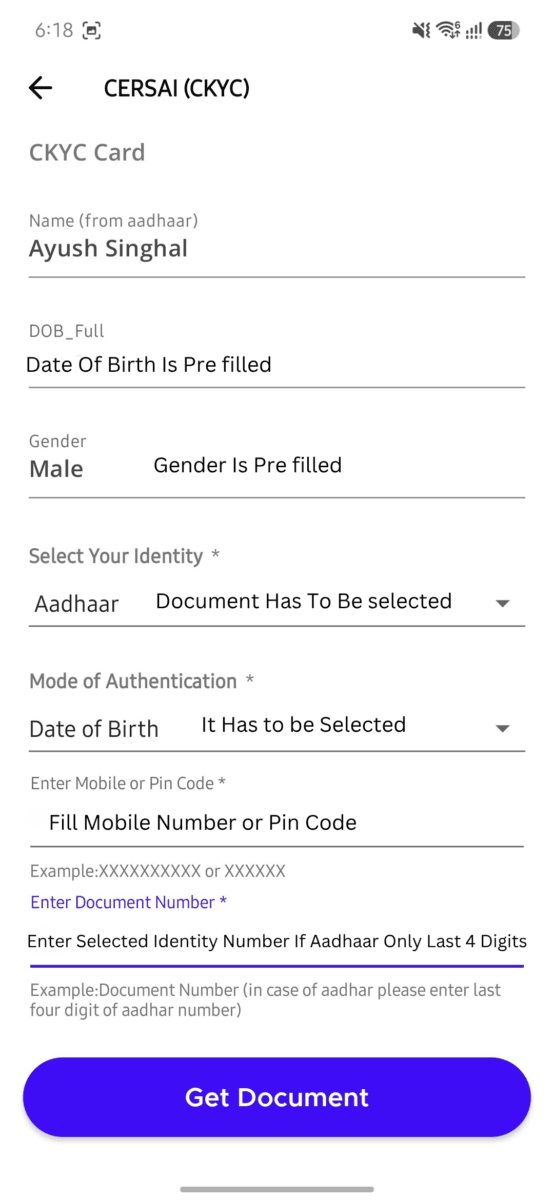
The application will open a secure fetching form. Your full Name, Date of Birth (DOB), and Gender are automatically populated from your verified profile records. To link your profile, select the following parameters from the form menus:
Select Your Identity: Tap the dropdown and select “Aadhaar”.
Mode of Authentication: Tap the dropdown and select “Date of Birth”.
Enter Mobile or Pin Code: Fill in your local area Pincode.
Enter Document Number: Since Aadhaar was chosen as the identity type, simply fill in the last 4 digits of your card number .
Digilocker CKYC Fetching Form
Step 3: Fetch and Access the Issued Card
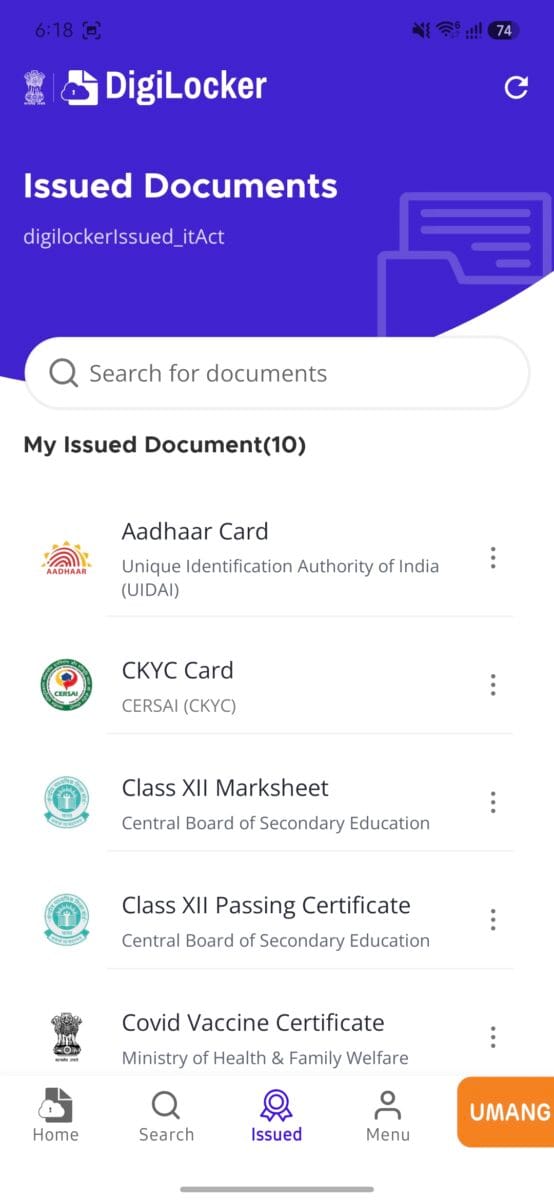
Ensure the data authorization consent box remains checked, and tap the large purple “Get Document” button at the bottom of the form. DigiLocker will query the central database repository, securely pulling your verified financial identity document onto your device within 10 seconds.
CKYC Card In Issued Documents List
💡 Stuck on your status? If you are unsure whether your profile is registered with CERSAI or want to check your unique 14-digit identifier first, use our complete companion guide on how to download your CKYC number online for a complete step-by-step verification and downloading CKYC card.
How to Fetch and Link Your APAAR ID / ABC ID
Under the National Education Policy (NEP), every student in India—from school to university—is assigned a unique 12-digit APAAR ID (Automated Permanent Academic Account Registry), also widely known as the ABC ID (Academic Bank of Credits).
This digital card acts as a centralized academic locker that tracks your exam results, credits, and degrees across different institutions. DigiLocker is the official partner platform used to generate and download this card instantly.
Step-by-Step Student ID Retrieval:
Step 1: Locate the Academic Bank of Credits
Go to the Search tab on your DigiLocker dashboard, type “APAAR” or “ABC ID” into the directory search bar, and select the official Academic Bank of Credits issuer option when it appears.
Step 2: Input Your Academic Credentials
The form will automatically map your verified name, date of birth, and gender from your primary profile records. To fetch the card, you will need to provide the following details:
Admission Year: Select the year you took admission into your current school, college, or university.
Identity Type: Select how you want the system to identify your record from the dropdown menu (Options include: Roll Number, Registration Number, Enrolment Number, New Admission, or None).
Identity Value: Enter the exact number corresponding to the identity type you selected above (e.g., your university registration number or school roll number).
Institution Name: Select your school, board, or university from the comprehensive dropdown list of authorized Indian educational institutions.
Step 3: Generate the Digital Student Card
Tick the data sharing consent checkbox and tap the purple “Get Document” button. DigiLocker will establish a secure connection with the National Academic Depository, generate your unique student account registry, and place your official APAAR/ABC ID Card straight into your Issued Documents tab for permanent, legal use.
Essential DigiLocker Features You Should Be Using
DigiLocker is far more than just an ID storage tool. Make sure to take full advantage of these advanced, integrated utilities:
Instant Financial KYC & Banking: Major regulatory bodies—including the RBI, SEBI, and IRDAI—explicitly authorize financial institutions, online brokerages, and insurance providers to accept valid digital credentials pulled straight from DigiLocker. This completely cuts out physical paperwork when opening bank accounts, setting up trading profiles, or establishing Central KYC (CKYC) registry tracks.
DigiLocker Drive (1.0 GB Personal Cloud): Tap the “Drive” module within your workspace dashboard to upload legacy documents. You can upload existing digital files or activate your smartphone’s camera directly through the app to capture and save clean document images.
Designate a Digital Wallet Nominee: To protect your records in the event of an unforeseen tragedy, DigiLocker includes an integrated asset tracking safety feature. You can securely assign a designated family nominee, granting them legal permission to securely view and manage your verified structural repository files.
Cross-Platform Government Authenticator: DigiLocker functions as a central Single Sign-On (SSO) gateway. You can use your account to instantly authenticate your identity and log into various local, state, and central government service platforms without managing separate passwords.
Another government initiative worth knowing about is DIGIPIN, India Post’s digital addressing system that pinpoints your exact location down to 4 metres.
DigiLocker Drive: How to Upload Your Personal Files (1GB Storage)
While DigiLocker is famous for automatically fetching official government documents, it also doubles as a secure cloud locker for your personal, legacy papers. Every registered user gets 1.0 GB of free cloud storage space inside a module called DigiLocker Drive.
This is the perfect place to safely store scanned copies of non-digitized documents, such as old school certificates, birth certificates, medical reports, or rental agreements.
⚠️ Important Reminder for Readers: As per the IT Act Rules, self-uploaded files in your DigiLocker Drive are excellent for safekeeping and easy sharing, but they do not carry the same official legal validity as the verified documents fetched directly from government databases.
Understanding the DigiLocker Drive Layout
When you first open your drive dashboard, DigiLocker thoughtfully organizes your cloud space into three default folders to keep things tidy:
Health: For prescription papers, vaccination logs, and medical bills.
Education: For older degree certificates, local school reports, or course achievements.
Documents: Your general-purpose folder for general IDs and miscellaneous files.
Step-by-Step: How to Upload a File to Your Drive
Uploading files from your mobile phone is simple and can be done in two different ways depending on whether your document is already saved on your phone or if you have a physical copy in front of you.
Step 1: Open Your Target Folder
Navigate to your DigiLocker Drive dashboard and click on the specific folder where you want to store your file (for example, tapping on the Documents folder). If the folder is empty, you will see a clean screen indicating no files have been added yet.
Step 2: Initiate a New Upload
Tap the large, prominent purple “+ New” or “+” action button located on the screen.
Step 3: Choose Your Upload Method
The app will open a prompt giving you two convenient choices:
Upload File: Select this option if your document is already saved on your phone as a PDF or an Image (JPEG/PNG). It will open your phone’s local file manager so you can browse and pick the file.
Use Camera: Select this option if you are holding a physical piece of paper. DigiLocker will activate your smartphone’s built-in camera, allowing you to snap a clear, well-lit photo of the paper to upload it instantly.
Step 4: Confirm Your File upload
Once selected or photographed, the app handles the secure transit encryption. Your file will appear directly beneath your default folders, complete with its file size (e.g., KB or MB markers) and format icon.
💡 Pro-Blogger Tips for a Clean DigiLocker Drive:
Rename Your Files Immediately: When you take a picture using your camera, the app might save it with a generic string name (like 45848117...jpg). Tap the three vertical dots (⋮) next to the uploaded file to rename it to something easily recognizable (like Birth_Certificate.pdf or Graduation_Certificate.jpg).
Keep Under File Limits: Ensure individual documents are optimized and compressed before uploading so you can maximize your free 1 GB threshold. Blank text files or empty system directory entries will register as 0.0 byte spaces until files are formally pushed into t
How to Access DigiLocker on Your Laptop or Desktop (PC Guide)
While the mobile app is perfect for on-the-go verification, using DigiLocker on a laptop or desktop computer is often much faster when you are filling out online job applications, uploading large legacy files, or completing digital KYC profiles.
The desktop version gives you a spacious, clean web dashboard where you can manage your files with ease. Here is how to access and navigate it:
Step 1: Visit the Official Portal and Access Login
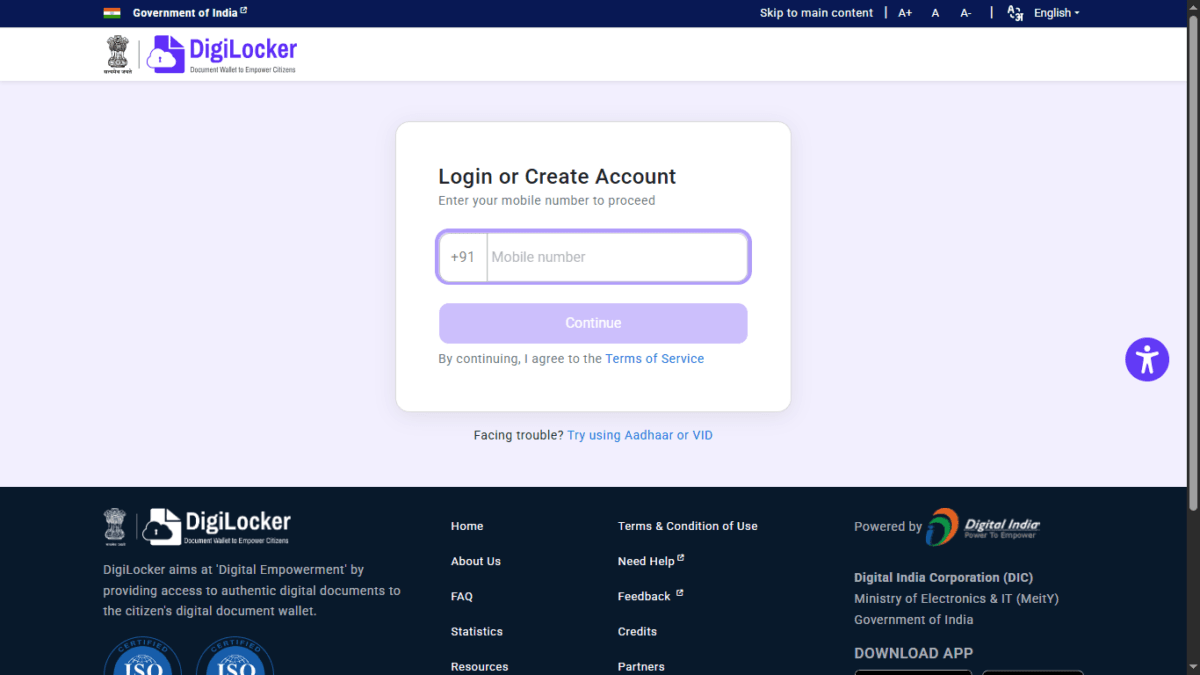
Open your web browser and navigate to the official website: [https://www.digilocker.gov.in/](https://www.digilocker.gov.in/). Click on the “Sign In” button in the top-right corner to open the centralized authentication interface.
Desktop Login Page
Step 2: Authenticate and Access Your Dashboard
Enter your credentials and verify the secure session using the incoming 6-digit verification code then enter otp . Once logged in, you will be greeted by a comprehensive web-based dashboard that lays out your entire digital wallet at a glance.
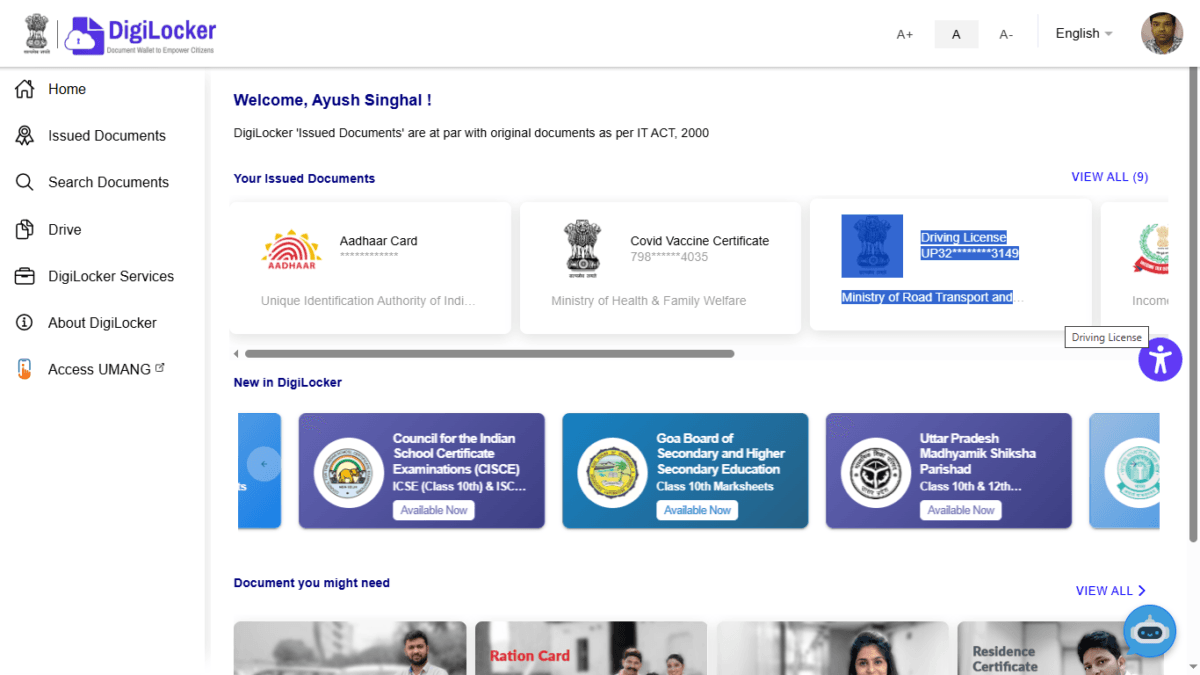
Digilocker Desktop dashboard
Navigating the Desktop Dashboard Interface
The desktop view makes managing your records incredibly straightforward thanks to its highly scannable layout:
The Control Sidebar: Located on the left side of your screen, this menu allows you to jump instantly between Home, your verified Issued Documents, the Search Documents library, and your personal Drive cloud storage.
Your Issued Documents Carousel: Positioned right at the top of your homepage, this section showcases your active, digitally verified records—such as your Aadhaar Card, Covid Vaccine Certificate, and Driving License—with masked identification strings for privacy.
Educational Hub Indicators: Directly below your active documents, the dashboard features dedicated, direct-access shortcuts for major academic repositories like the Council for the Indian School Certificate Examinations (CISCE) and the Uttar Pradesh Madhyamik Shiksha Parishad, letting students track down results with a single click.
How to Download Documents to Your Computer
Once you are logged into the web portal, saving your official documents directly to your PC’s local storage takes seconds:
Click on “Issued Documents” from the left-hand sidebar menu.
Find the specific record you need from your active list.
Click the “Download” utility icon next to it and select “PDF”. The document will download instantly, ready to be attached to job portals, university forms, or official applications.
Frequently Asked Questions (FAQ)
What happens if the DigiLocker app logs me out automatically?
The platform uses an automated security timeout mechanism to terminate active sessions after periods of extended user inactivity. If you are logged out, you do not need to re-verify your identity from scratch. Simply open the app, enter your Aadhaar registered mobile number and then enter OTP and pre-configured 6-digit personal security PIN, and click verify to instantly restore access.
Can traffic police decline a driving license shown inside DigiLocker?
No. Under Rule 9A of the IT Rules, 2016, digital documents issued directly into your DigiLocker app from official databases (like the Ministry of Road Transport and Highways) are legally identical to their physical counterparts. Enforcement officers can instantly authenticate your records against the official source database using their own digital scanning devices.
Are my documents safe from database breaches and tracking? Is Digilocker safe
Yes. The platform operates on a robust, international standard architecture certified under ISO 27001:2022 and ISO 27034 application safety protocols. It utilizes strict end-to-end encryption for all transmissions, requires multi-factor authentication (MFA) or biometric access for logins, and operates entirely on explicit, user-granted data consent permissions.
Disclaimer : The user interfaces, options, and workflows displayed reflect the official DigiLocker application (Ministry of Electronics & IT, Government of India). To protect individual privacy and comply with data security standards, all personal identification numbers, addresses, and sensitive credentials belonging to real individuals have been strictly masked, blurred, or replaced with placeholder data. techmitra.in is an independent technology blog and is not officially affiliated with, endorsed by, or partnered with MeitY, Digital India, or any government agency. For the most up-to-date and authoritative guidelines, always refer directly to the official portal at digilocker.gov.in
Ayush Singhal is the founder and chief editor of TechMitra.in — a tech hub dedicated to simplifying gadgets, AI tools, and smart innovations for everyday users. With over 15 years of business experience, a Bachelor of Computer Applications (BCA) degree, and 5 years of hands-on experience running an electronics retail shop, Ayush brings real-world gadget knowledge and a genuine passion for emerging technology.
At TechMitra, he covers everything from AI breakthroughs and gadget reviews to app guides, mobile tips, and digital how-tos. His goal is simple — to make tech easy, useful, and enjoyable for everyone. When he’s not testing the latest devices or exploring AI trends, Ayush spends his time crafting tutorials that help readers make smarter digital choices.
📍 Based in Lucknow, India
💡 Focus Areas: Tech News • AI Tools • Gadgets • Digital How-Tos
📧 Contact: Get in touch →